# Build a Token Shop with Price Feeds ## Token Shop: Using Chainlink Data Feeds to calculate the price In this lesson, we'll build a "TokenShop" smart contract that enables users to purchase tokens. It will use the ETH/USD price feed to calculate how many tokens to issue to a purchaser, based on the amount of ETH they pay. Our shop will leverage Chainlink Data Feeds to establish accurate token pricing in USD. When users send ETH to the contract, it will: 1. Query the current ETH/USD exchange rate. 2. Calculate the USD value of the sent ETH. 3. Determine the appropriate amount of tokens to mint based on our fixed USD token price. 5. Mint and transfer the calculated tokens directly to the buyer. The `TokenShop` contract will integrate with our custom ERC-20 token contract from Section 2. ## Writing the TokenShop smart contract 1. First, open [Remix IDE](https://remix.ethereum.org). 2. Click on the **File Explorer** button on the left vertical navigation bar and create a new file that you can name `TokenShop.sol`.  3. Copy the code from the [course code repo on GitHub](https://github.com/ciaranightingale/chainlink-fundamentals-code/blob/main/data-feeds/TokenShop.sol) and paste it into your `TokenShop.sol` file. When pasting into Remix, you may get an alert that you’re pasting code—just click **Close**. Feel free to copy and paste the code and get a feel for using Data Feeds without understanding the ins and outs of the code. This lesson is focused on ensuring you understand what Price and Data Feeds are and what they can be used for. If so, skip to the **deployment section**. However, we have included a code breakdown if you want to understand the code. This is confusing and challenging, so do not worry if you don't understand it since this course aims to explain the Chainlink services rather than how to become a Solidity developer. If you want a deeper understanding, the [Solidity course](https://updraft.cyfrin.io/courses/solidity) provides more detailed explanations. ### Understanding the code Let's quickly walk through this smart contract to understand what's happening. Note that the Solidity Smart contract developer course discusses how to use price feeds in more depth in the [FundMe Section](https://updraft.cyfrin.io/courses/solidity/fund-me/fund-me-intro). #### Imports In order to call functions on the price feed and `MyERC20`, we need the following imports: ```solidity import { AggregatorV3Interface } from "@chainlink/contracts/src/v0.8/interfaces/AggregatorV3Interface.sol"; import { Ownable } from "@openzeppelin/contracts@4.6.0/access/Ownable.sol"; import { MyERC20 } from "./MyERC20.sol"; ``` Let's now explain that extra `Ownable` import. #### Ownable We need our contract to have an owner. To do this, we will inherit a smart contract from OpenZeppelin that sets the address passed to the Ownable constructor to an `internal` state variable called `_owner`. This owner address is accessible using the external `owner` function. Let's import and inherit the contract and then invoke the constructor: ```solidity // SPDX-License-Identifier: MIT pragma solidity ^0.8.26; import { Ownable } from "@openzeppelin/contracts@5.2.0/access/Ownable.sol"; contract TokenShop is Ownable { constructor() Ownable(msg.sender) {} // we have set the contract owner to be the contract deployer (msg.sender) } ``` Here, we have set the `msg.sender` to be the contract owner. This will be the address deploying the contract since the constructor is invoked by the deployer automatically when the contract is deployed. This allows us to use the `onlyOwner` modifier from the `Owner` contract to prevent anyone but the contract owner from calling functions with this modifier. #### State variables and the constructor In the constructor, we will set two immutable variables: - `i_priceFeed`: The ETH/USD price feed contract must follow the `AggregatorV3Interface`; therefore, we cast the feed address to the required contract type. - `i_token`: The `MyERC20` contract needs to follow `MyERC20`, so we cast it to that contract type. We also define the following constant state variables: - `TOKEN_DECIMALS`: The number of decimals for the `MyERC20` token (which we set before as 18 decimals) - `TOKEN_USD_PRICE`: The price of a token in USD. We also define some events and errors we will be using in the contract. ```solidity AggregatorV3Interface internal immutable i_priceFeed; MyERC20 public immutable i_token; uint256 public constant TOKEN_DECIMALS = 18; uint256 public constant TOKEN_USD_PRICE = 2 * 10 ** TOKEN_DECIMALS; // 2 USD with 18 decimals event BalanceWithdrawn(); error TokenShop__ZeroETHSent(); error TokenShop__CouldNotWithdraw(); constructor(address tokenAddress) Ownable(msg.sender) { i_token = MyERC20(tokenAddress); /** * Network: Sepolia * Aggregator: ETH/USD * Address: 0x694AA1769357215DE4FAC081bf1f309aDC325306 */ i_priceFeed = AggregatorV3Interface(0x694AA1769357215DE4FAC081bf1f309aDC325306); } ``` #### Receive function We need to give users a way to send the contract ETH and `receive` tokens from the `MyERC20` contract. To do this, we use a `receive` function. `receive` functions are special functions in Solidity that are automatically executed when someone sends ETH directly to the contract address without specifying any function to call. They don't take any arguments and don't return any values. When a user sends ETH to our contract, the `receive` function will capture that ETH, calculate how many tokens they should get based on the current exchange rate, and then mint those tokens to the sender's address. This creates a simple way for users to swap their ETH for our custom token without needing to call a specific function - they can send ETH directly to the contract address using a standard transaction. ```solidity receive() external payable { // convert the ETH amount to a token amount to mint if (msg.value == 0) { revert TokenShop__ZeroETHSent(); } // convert the ETH sent to the contract to a token amount to mint and then mint the tokens i_token.mint(msg.sender, amountToMint(msg.value)); } ``` We have also added a check that the user hasn't called the contract and sent `0 ETH`. If they have, we have reverted with a custom error. **Note**: we must give the `TokenShop` contract permissions to call `MyERC20::mint`. #### amountToMint function In the `receive` function, we called a function called `amountToMint`, which we need to define. This function gets the ETH/USD price so that we can convert the amount of ETH sent to the contract to a USD amount. Then, we calculate the amount of tokens this USD amount corresponds to: ```solidity function amountToMint(uint256 amountInETH) public view returns (uint256) { // Sent amountETH, convert to USD amount uint256 ethUsd = uint256(getChainlinkDataFeedLatestAnswer()) * 10 ** 10; // ETH/USD price with 8 decimal places -> 18 decimals uint256 ethAmountInUSD = amountInETH * ethUsd / 10 ** 18; // ETH = 18 decimals return (ethAmountInUSD * 10 ** TOKEN_DECIMALS) / TOKEN_USD_PRICE; // * 10 ** TOKEN_DECIMALS since tokenAmount needs to be in TOKEN_DECIMALS } ``` #### Implementing chainlink data feeds We now need to implement `getChainlinkDataFeedLatestAnswer` to get the ETH/USD price conversion: ```solidity /** * Returns the latest answer */ function getChainlinkDataFeedLatestAnswer() public view returns (int) { ( /*uint80 roundID*/, int price, /*uint startedAt*/, /*uint timeStamp*/, /*uint80 answeredInRound*/ ) = i_priceFeed.latestRoundData(); return price; } ``` Here, we have called the `latestRountData` function on the specific price feed address we set in the `constructor`. Since we only need the `price`, the other return values have been commented out. #### Withdraw Finally, let's create a way for the owner of the smart contract to withdraw the ETH in the contract using a low-level `call`: ```solidity function withdraw() external onlyOwner { // low level calls can be done on payable addresses (bool success, ) = payable(owner()).call{value: address(this).balance}(""); if (!success) { revert TokenShop__CouldNotWithdraw(); } emit BalanceWithdrawn(); } ``` For more information on low-level calls and sending ETH within a smart contract, [visit this lesson on Updraft](https://updraft.cyfrin.io/courses/solidity/fund-me/sending-eth-from-a-contract). ## Deploying the TokenShop contract 1. Go to the **Deploy & Run Transactions** tab within Remix. 2. Select the `TokenShop.sol` contract from the contract field in the deployment tab. 3. Make sure that your MetaMask browser wallet is connected to Sepolia and that you’ve connected to MetaMask as your Remix environment (the injected provider). 4. The TokenShop contract requires a `tokenAddress` as a constructor parameter. So, paste the `MyERC20.sol` contract address you deployed in the previous section. 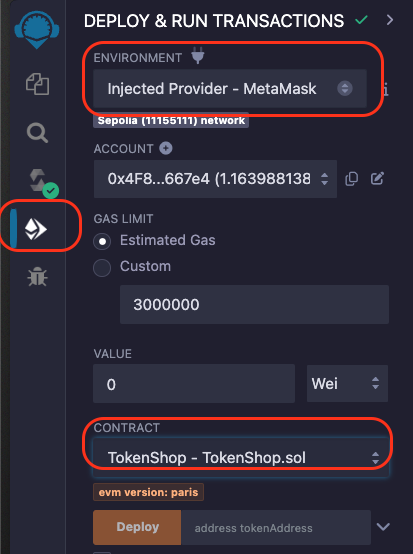 5. Click on **Deploy**, and this will open MetaMask. Hit **Confirm** to sign the transaction on Sepolia. This will deploy the `TokenShop` contract to Sepolia testnet. After it’s deployed to Sepolia, you will see the transaction details in Remix’s console sub-window. 6. Copy your `TokenShop` contract address from the **Deployed Contracts** section in Remix. 7. It’s a good idea to “pin” the `TokenShop` contract in this workspace so you can still access it if you end up closing Remix and returning later. Ideally, at this point, both your `MyERC20` and `TokenShop` contracts should be pinned to your active Remix Workspace. 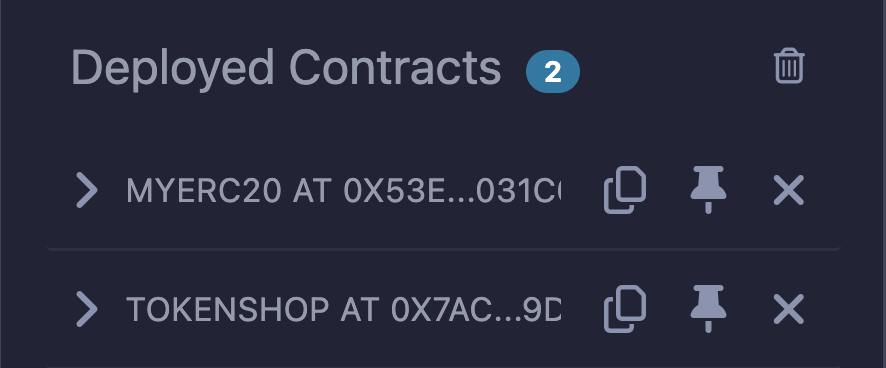 ## TokenShop Access Control Now let's give your `TokenShop` contract the ability to “mint” your tokens from the `MyERC20` contract! We need to give the `TokenShop` contract the `MINTER_ROLE`. 1. In the **Deployed contracts** section, find your `MyERC20` contract dropdown. Look for the `MINTER_ROLE` function. Since it is a public state variable, it will have an automatic getter function to "get" it's value. 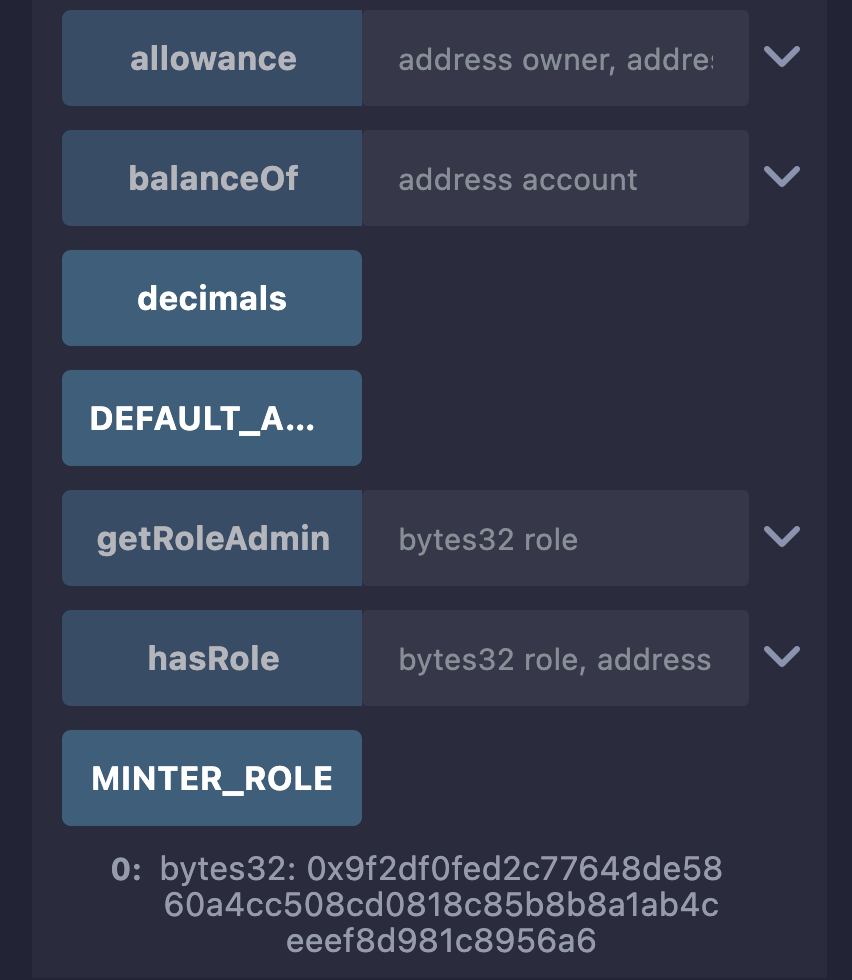 2. Click it to read the data from your smart contract. Its value is `“0x9f2df0fed2c77648de5860a4cc508cd0818c85b8b8a1ab4ceeef8d981c8956a6”`. This is the [keccak256](https://www.cyfrin.io/glossary/keccak256) hash string representing the word “MINTER_ROLE”. 3. Next, expand the `grantRole` function using the down arrow and paste that `MINTER_ROLE` hash `0x9f2df0fed2c77648de5860a4cc508cd0818c85b8b8a1ab4ceeef8d981c8956a6` into the `grantRole` function along with the address of the `TokenShop` contract you just deployed: 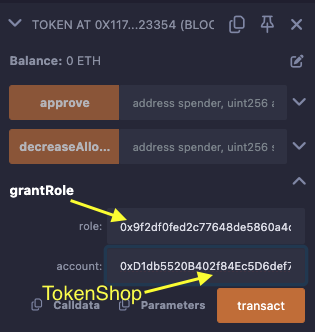 4. Click `transact` to call the function and then sign the transaction in the MetaMask pop-up by clicking **Confirm**. Doing this will authorize your `TokenShop` to mint your newly created token. Before we continue, let’s double-check and confirm that your `TokenShop` has indeed been authorized. ### Check roles 1. In your `Token` contract dropdown menu, find the `hasRole` function. 2. Expand the function and note that it requires two parameters: - `role`: We are interested in the `MINTER_ROLE`, which as a `bytes32` value is `0x9f2df0fed2c77648de5860a4cc508cd0818c85b8b8a1ab4ceeef8d981c8956a6`. This is the **keccak256 hash** of the string `"MINTER_ROLE"`. We will refer to those bytes as the **hash** from now. - `account`: This function will tell us what role a given account has—in our case, the `account` we are checking the role for the `TokenShop` contract address. The function will return a boolean (`true` or `false`) indicating whether that address has that particular role assigned to it. 3. Put in those two inputs and click on the `hasRole` button. It should return a boolean response of `true`.  ## Getting Price Data From Chainlink Price Feeds We will now use the Chainlink USD/ETH Price Feed that we referenced inside our `TokenShop` contract. - Go to your `TokenShop` contract dropdown and find the `getChainlinkDataFeedLatestAnswer` function. You can hover your mouse over the buttons to see the full function name. - Click on the **transact** to call that function and send a transaction. It will return the price with 8 decimal places. 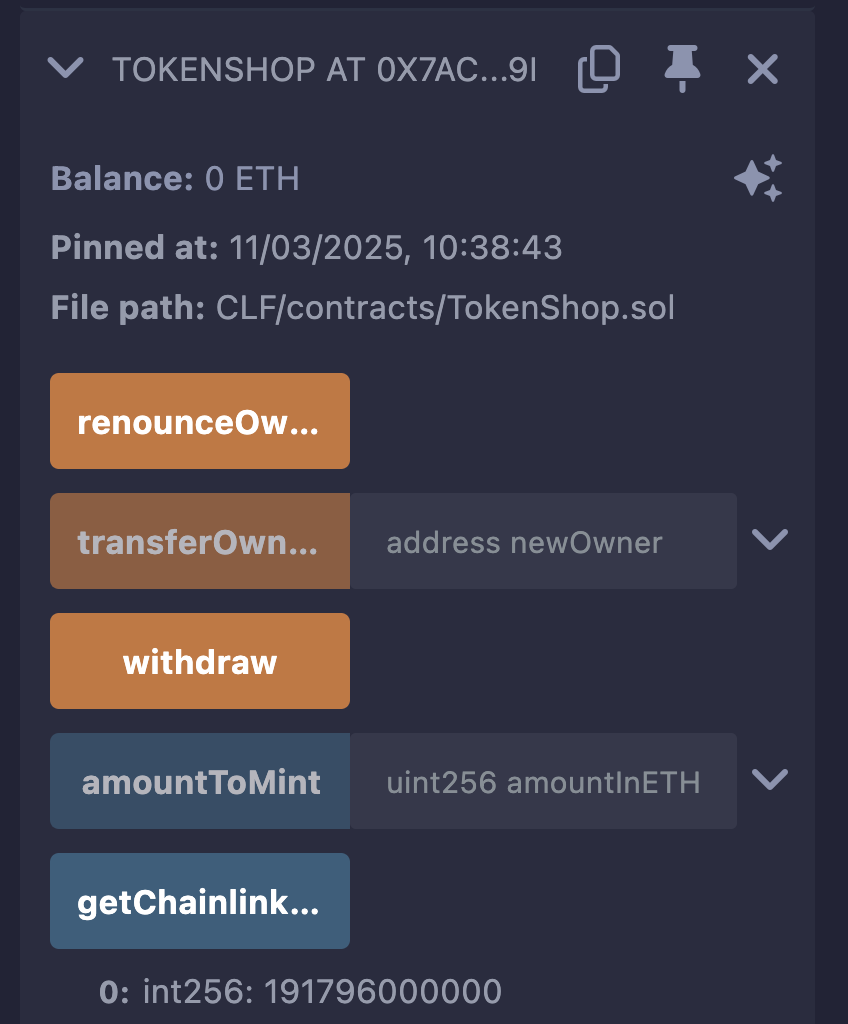 This is the price of `1 ETH` in terms of `USD` using 8 decimal precision. Note that different feeds may have different precisions. You can find the decimals for the different feeds in the [Price Feeds Documentation](https://docs.chain.link/data-feeds/price-feeds/addresses?network=ethereum&page=1#sepolia-testnet) (make sure “Show More Details” is checked). To convert the integer (with a certain level of precision) to a float, we need to divide the result by 10, raised to the power of the number of decimal points (`8` in this case). Since the ETH/USD price feed’s data has `8` decimal places, we can see that the price, as per the screenshot, is $1917.96 (divide the returned value by `10^8`).
Build a Token Shop with Price Feeds
Token Shop: Using Chainlink Data Feeds to calculate the price
In this lesson, we'll build a "TokenShop" smart contract that enables users to purchase tokens. It will use the ETH/USD price feed to calculate how many tokens to issue to a purchaser, based on the amount of ETH they pay.
Our shop will leverage Chainlink Data Feeds to establish accurate token pricing in USD.
When users send ETH to the contract, it will:
Query the current ETH/USD exchange rate.
Calculate the USD value of the sent ETH.
Determine the appropriate amount of tokens to mint based on our fixed USD token price.
Mint and transfer the calculated tokens directly to the buyer.
The TokenShop contract will integrate with our custom ERC-20 token contract from Section 2.
Writing the TokenShop smart contract
-
First, open Remix IDE.
-
Click on the File Explorer button on the left vertical navigation bar and create a new file that you can name
TokenShop.sol.

Copy the code from the course code repo on GitHub and paste it into your
TokenShop.solfile.
When pasting into Remix, you may get an alert that you’re pasting code—just click Close.
Feel free to copy and paste the code and get a feel for using Data Feeds without understanding the ins and outs of the code. This lesson is focused on ensuring you understand what Price and Data Feeds are and what they can be used for. If so, skip to the deployment section. However, we have included a code breakdown if you want to understand the code. This is confusing and challenging, so do not worry if you don't understand it since this course aims to explain the Chainlink services rather than how to become a Solidity developer. If you want a deeper understanding, the Solidity course provides more detailed explanations.
Understanding the code
Let's quickly walk through this smart contract to understand what's happening. Note that the Solidity Smart contract developer course discusses how to use price feeds in more depth in the FundMe Section.
Imports
In order to call functions on the price feed and MyERC20, we need the following imports:
Let's now explain that extra Ownable import.
Ownable
We need our contract to have an owner. To do this, we will inherit a smart contract from OpenZeppelin that sets the address passed to the Ownable constructor to an internal state variable called _owner. This owner address is accessible using the external owner function. Let's import and inherit the contract and then invoke the constructor:
Here, we have set the msg.sender to be the contract owner. This will be the address deploying the contract since the constructor is invoked by the deployer automatically when the contract is deployed.
This allows us to use the onlyOwner modifier from the Owner contract to prevent anyone but the contract owner from calling functions with this modifier.
State variables and the constructor
In the constructor, we will set two immutable variables:
i_priceFeed: The ETH/USD price feed contract must follow theAggregatorV3Interface; therefore, we cast the feed address to the required contract type.i_token: TheMyERC20contract needs to followMyERC20, so we cast it to that contract type.
We also define the following constant state variables:
TOKEN_DECIMALS: The number of decimals for theMyERC20token (which we set before as 18 decimals)TOKEN_USD_PRICE: The price of a token in USD.
We also define some events and errors we will be using in the contract.
Receive function
We need to give users a way to send the contract ETH and receive tokens from the MyERC20 contract. To do this, we use a receive function.
receive functions are special functions in Solidity that are automatically executed when someone sends ETH directly to the contract address without specifying any function to call. They don't take any arguments and don't return any values.
When a user sends ETH to our contract, the receive function will capture that ETH, calculate how many tokens they should get based on the current exchange rate, and then mint those tokens to the sender's address. This creates a simple way for users to swap their ETH for our custom token without needing to call a specific function - they can send ETH directly to the contract address using a standard transaction.
We have also added a check that the user hasn't called the contract and sent 0 ETH. If they have, we have reverted with a custom error.
Note: we must give the TokenShop contract permissions to call MyERC20::mint.
amountToMint function
In the receive function, we called a function called amountToMint, which we need to define. This function gets the ETH/USD price so that we can convert the amount of ETH sent to the contract to a USD amount. Then, we calculate the amount of tokens this USD amount corresponds to:
Implementing chainlink data feeds
We now need to implement getChainlinkDataFeedLatestAnswer to get the ETH/USD price conversion:
Here, we have called the latestRountData function on the specific price feed address we set in the constructor. Since we only need the price, the other return values have been commented out.
Withdraw
Finally, let's create a way for the owner of the smart contract to withdraw the ETH in the contract using a low-level call:
For more information on low-level calls and sending ETH within a smart contract, visit this lesson on Updraft.
Deploying the TokenShop contract
Go to the Deploy & Run Transactions tab within Remix.
Select the
TokenShop.solcontract from the contract field in the deployment tab.Make sure that your MetaMask browser wallet is connected to Sepolia and that you’ve connected to MetaMask as your Remix environment (the injected provider).
The TokenShop contract requires a
tokenAddressas a constructor parameter. So, paste theMyERC20.solcontract address you deployed in the previous section.

Click on Deploy, and this will open MetaMask. Hit Confirm to sign the transaction on Sepolia. This will deploy the
TokenShopcontract to Sepolia testnet.
After it’s deployed to Sepolia, you will see the transaction details in Remix’s console sub-window.
Copy your
TokenShopcontract address from the Deployed Contracts section in Remix.It’s a good idea to “pin” the
TokenShopcontract in this workspace so you can still access it if you end up closing Remix and returning later.
Ideally, at this point, both your MyERC20 and TokenShop contracts should be pinned to your active Remix Workspace.

TokenShop Access Control
Now let's give your TokenShop contract the ability to “mint” your tokens from the MyERC20 contract! We need to give the TokenShop contract the MINTER_ROLE.
In the Deployed contracts section, find your
MyERC20contract dropdown. Look for theMINTER_ROLEfunction. Since it is a public state variable, it will have an automatic getter function to "get" it's value.

-
Click it to read the data from your smart contract. Its value is
“0x9f2df0fed2c77648de5860a4cc508cd0818c85b8b8a1ab4ceeef8d981c8956a6”. This is the keccak256 hash string representing the word “MINTER_ROLE”. -
Next, expand the
grantRolefunction using the down arrow and paste thatMINTER_ROLEhash0x9f2df0fed2c77648de5860a4cc508cd0818c85b8b8a1ab4ceeef8d981c8956a6into thegrantRolefunction along with the address of theTokenShopcontract you just deployed:

Click
transactto call the function and then sign the transaction in the MetaMask pop-up by clicking Confirm.
Doing this will authorize your TokenShop to mint your newly created token.
Before we continue, let’s double-check and confirm that your TokenShop has indeed been authorized.
Check roles
In your
Tokencontract dropdown menu, find thehasRolefunction.Expand the function and note that it requires two parameters:
role: We are interested in theMINTER_ROLE, which as abytes32value is0x9f2df0fed2c77648de5860a4cc508cd0818c85b8b8a1ab4ceeef8d981c8956a6. This is the keccak256 hash of the string"MINTER_ROLE". We will refer to those bytes as the hash from now.account: This function will tell us what role a given account has—in our case, theaccountwe are checking the role for theTokenShopcontract address.
The function will return a boolean (true or false) indicating whether that address has that particular role assigned to it.
Put in those two inputs and click on the
hasRolebutton. It should return a boolean response oftrue.

Getting Price Data From Chainlink Price Feeds
We will now use the Chainlink USD/ETH Price Feed that we referenced inside our TokenShop contract.
Go to your
TokenShopcontract dropdown and find thegetChainlinkDataFeedLatestAnswerfunction. You can hover your mouse over the buttons to see the full function name.Click on the transact to call that function and send a transaction. It will return the price with 8 decimal places.

This is the price of 1 ETH in terms of USD using 8 decimal precision. Note that different feeds may have different precisions.
You can find the decimals for the different feeds in the Price Feeds Documentation (make sure “Show More Details” is checked).
To convert the integer (with a certain level of precision) to a float, we need to divide the result by 10, raised to the power of the number of decimal points (8 in this case).
Since the ETH/USD price feed’s data has 8 decimal places, we can see that the price, as per the screenshot, is $1917.96 (divide the returned value by 10^8).
Build Token Shop With Price Feeds
A practical guide to Build a Token Shop with Price Feeds - Learn to create a TokenShop smart contract using Chainlink Price Feeds to dynamically price tokens based on real-time ETH/USD rates. Deploy the contract, manage access control, and interact with price data on the Sepolia testnet.

Course Overview
About the course
What you'll learn
Smart contract and Solidity fundamentals
Chainlink’s decentralized oracle network (DON)
Chainlink Data Feeds
Chainlink Data Streams
Chainlink Automation
Chainlink CCIP
Chainlink Functions
Verifiable Random Function (VRF)
Chainlink Proof of Reserve
Course Description
Who is this course for?
- Smart Contract Developers
- Solutions Architects
- Blockchain Engineers
- Web3 Developers
- Security Researchers
Potential Careers
Smart Contract Engineer
$100,000 - $150,000 (avg. salary)
DeFi Developer
$75,000 - $200,000 (avg. salary)
Web3 developer
$60,000 - $150,000 (avg. salary)
Web3 Developer Relations
$85,000 - $125,000 (avg. salary)
Smart Contract Auditor
$100,000 - $200,000 (avg. salary)
Security researcher
$49,999 - $120,000 (avg. salary)
Blockchain Financial Analyst
$100,000 - $150,000 (avg. salary)


Last updated on July 25, 2025

Certification: Chainlink Fundamentals
The Chainlink Fundamentals proficiency exam covers is designed to confirm your grasp of all key concepts and learnings presented in the course material. Exam takers will have 75 minutes to complete 50 questions and must score 30/50 to pass and earn a Certificate of Completion. Because course material is continually updated, The Chainlink Fundamentals Certificate of Completions expires after 1 year. To remain current, holders must re-take the exam and pass to confirm their current knowledge.

Course Overview
About the course
What you'll learn
Smart contract and Solidity fundamentals
Chainlink’s decentralized oracle network (DON)
Chainlink Data Feeds
Chainlink Data Streams
Chainlink Automation
Chainlink CCIP
Chainlink Functions
Verifiable Random Function (VRF)
Chainlink Proof of Reserve
Course Description
Who is this course for?
- Smart Contract Developers
- Solutions Architects
- Blockchain Engineers
- Web3 Developers
- Security Researchers
Potential Careers
Smart Contract Engineer
$100,000 - $150,000 (avg. salary)
DeFi Developer
$75,000 - $200,000 (avg. salary)
Web3 developer
$60,000 - $150,000 (avg. salary)
Web3 Developer Relations
$85,000 - $125,000 (avg. salary)
Smart Contract Auditor
$100,000 - $200,000 (avg. salary)
Security researcher
$49,999 - $120,000 (avg. salary)
Blockchain Financial Analyst
$100,000 - $150,000 (avg. salary)
Last updated on July 25, 2025