_Follow along the course with this video._ --- ### Browser Wallets The first concept we need to grasp when working with a website in Web3 is that of a browser wallet - in our case MetaMask. It's through a wallet like MetaMask that we are able to interact with the blockchain and the Web3 ecosystem. We can gain more insight into how this works by right-clicking our `FundMe` website and selecting `inspect`. You can also open this panel by pressing F12. 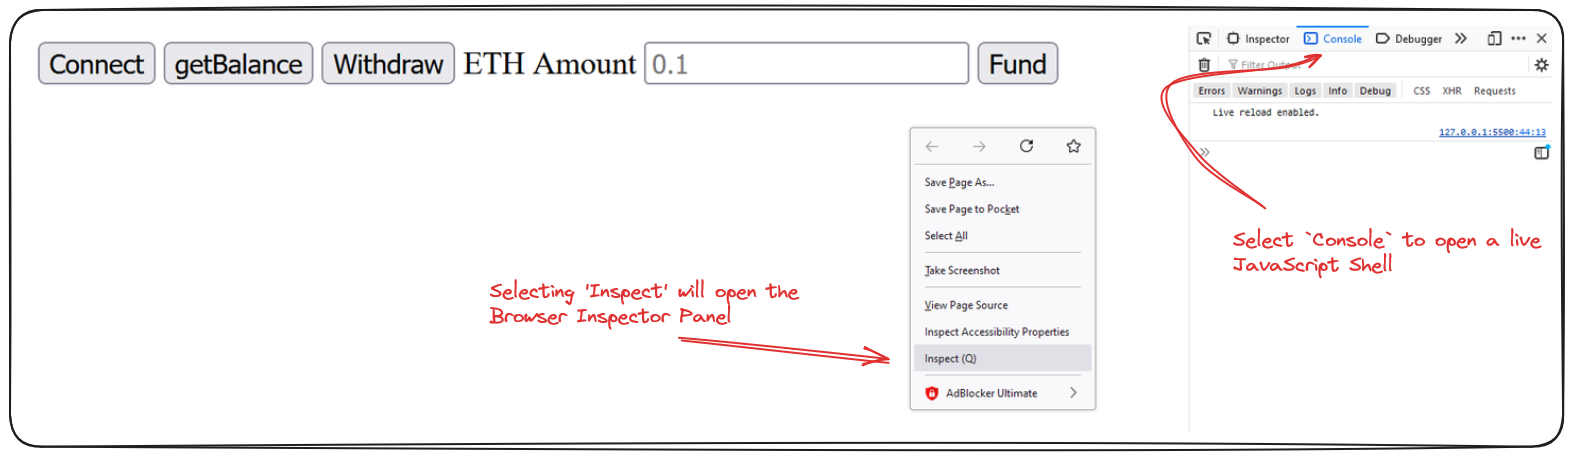 Navigate to the console tab of this panel. This tab contains a live JavaScript shell which houses a tonne of information about the browser we have open. Among this data is a JavaScript object, `window`. By typing `window` and hitting enter the console will display this object and all of the functions it contains. We should see something like this:  As seen in the image, there are some properties of this object which are not there by default, one of which is `window.ethereum`. It's through this property that a front end is able to interact with our wallet and it's accounts. > Try inspecting a browser without a browser wallet installed. You'll see that `window.ethereum` doesn't exist! I recommend reading the [**MetaMask documentation**](https://docs.metamask.io/guide/) on the window.ethereum object to learn more. ### The Code Alright, great. How does the code which interacts with all this look like? We can take a look at the `index.js` file in our html-fund-me repo for this. One of the first things you'll see is a `connect` function. This is pretty ubiquitous and is how most Web3 websites are told _Hey, I have a browser wallet, here are the accounts I want to use._ ```js async function connect() { if (typeof window.ethereum !== "undefined") { try { await ethereum.request({ method: "eth_requestAccounts" }); } catch (error) { console.log(error); } connectButton.innerHTML = "Connected"; const accounts = await ethereum.request({ method: "eth_accounts" }); console.log(accounts); } else { connectButton.innerHTML = "Please install MetaMask"; } } ``` We see the first thing that this function does is checks for our `window.ethereum` object then connects and requests accounts. > **Note:** This request for accounts does **not** provide access to your private key. It allows the website to send transaction requests to your wallet in order for you to sign. Let's look briefly at the HTML and how it calls this function. ```html <body> <button id="connectButton">Connect</button> ... </body> ``` The body of our `index.html` contains this button (among others) with the `id` `connectButton`. Switching to our `index.js` we see this: ```js const connectButton = document.getElementById("connectButton") ... connectButton.onclick = connect ``` This grabs the element of the webpage by the `id` we set and then uses the `onClick` method to call our `connect` function! ### Connecting in Action Clicking on the `Connect` button on our `html-fund-me` front end, should trigger our MetaMask to pop up. From there we can select an account and click connect. 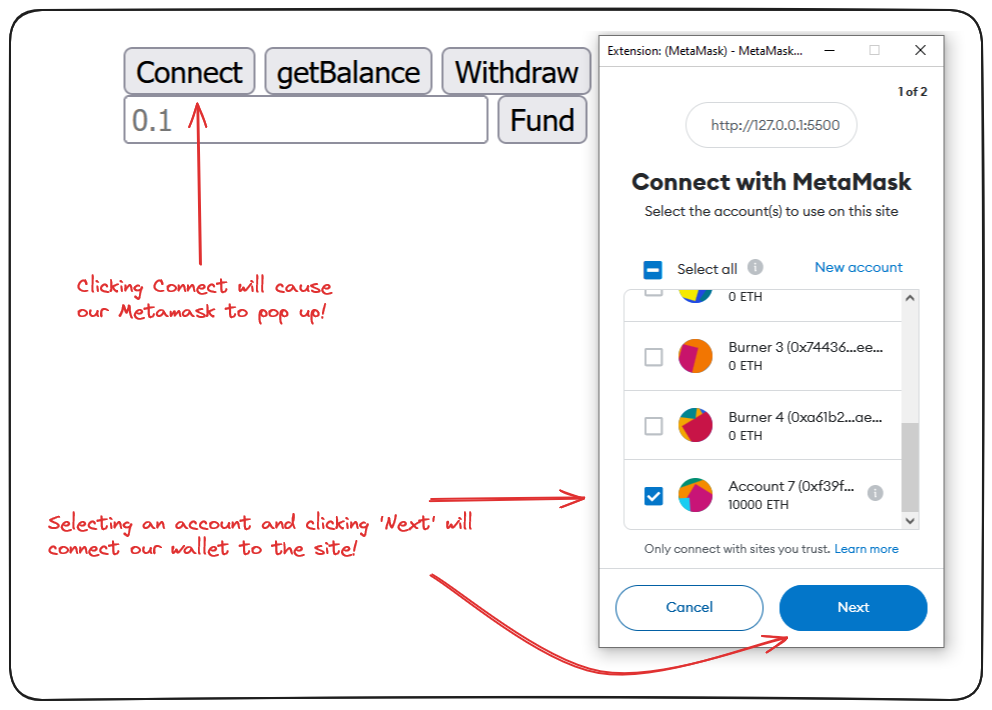 You'll know this works if your `Connect` button changes to `Connected` and an address is printed to your browser console. Now you're ready to interact! The functions on our front-end example should look familiar. They're the same as the FundMe backend we built in the previous section. Let's try calling `getBalance` and see how it works - if you're chain is currently set to Ethereum, you might actually get a balance. 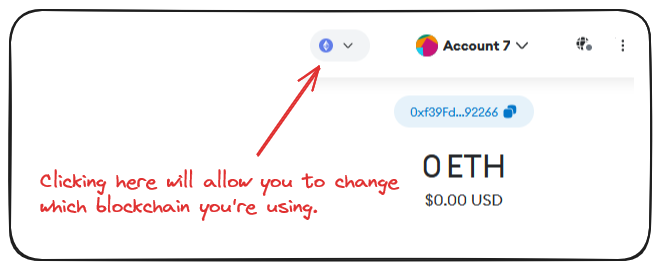 When the `getBalance` button is clicked, this is the function we're calling on our front-end. ```js async function getBalance() { if (typeof window.ethereum !== "undefined") { const provider = new ethers.BrowserProvider(window.ethereum); try { const balance = await provider.getBalance(contractAddress); console.log(ethers.formatEther(balance)); } catch (error) { console.log(error); } } else { balanceButton.innerHTML = "Please install MetaMask"; } } ``` As before, we're checking for the existence of `window.ethereum` and then .. defining a provider. ### RPC URLs and Providers `ethers` is a javascript package that simplifies the use and interaction of browser wallets with our code. What `ethers.BrowserProvider(window.ethereum)` is doing, is deriving the providers MetaMask is injecting into our `window.ethereum` object. The providers are the RPC URLs associated with the networks in our MetaMask account. 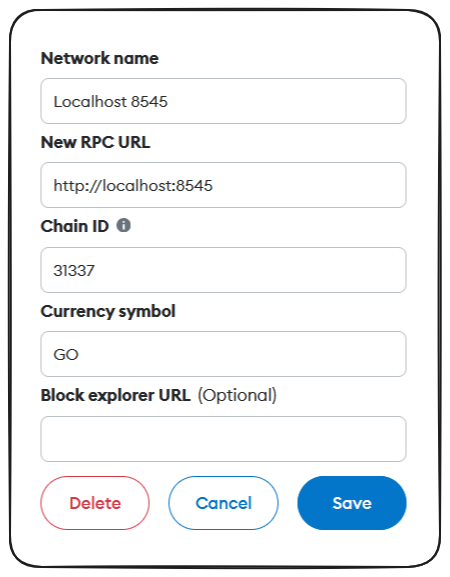 When we call functions on our front-end. We're effectively making API calls via the RPC URL to the blockchain. ### Trying it Out In order to get some experience trying this ourselves, we'll need to set up the backend of our project and import our anvil account into MetaMask. Open your foundry-fund-me directory in VS Code and in your terminal run `anvil`. This should spin up a local test chain for you. Copy one of the mock private keys it provides you in the terminal, we'll need this to import the account into our MetaMask wallet. With this chain running, open a second terminal and run the command `make deploy`. This will compile and deploy our FundMe project onto our locally running blockchain. Assuming you've not run into errors. That's all that's required to set up the back end. Return to MetaMask, and within your network selector choose `Add Network`.  Select `Add a network manually` linked at the bottom of the served page. In the subsequent page, inter your local network information as follows and click `Save`.  Next, we need to add one of our `anvil` accounts to the wallet! Click the account displayed at the top of your MetaMask and select `Add an account or hardware wallet` from the bottom of the list. You'll be prompted to `add a new account`, `import an account`, or `add a hardware wallet`. Select `import an account` and enter your previously copied mock private key into the field provided. 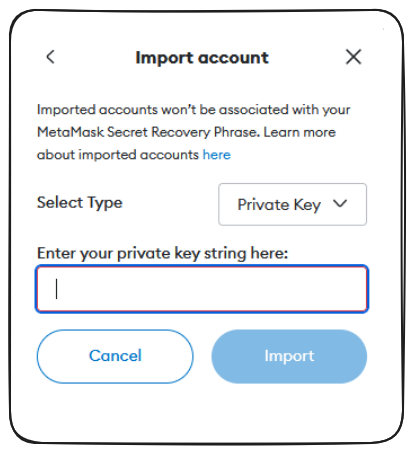 ALRIGHT. With all the set up done, we should be able to select our `anvil` chain in MetaMask, then select the account we just added and click the `connect` button. If we click `getBalance` we should have `0` returned in our console reflecting the balance of our deployed contract. At this point, we should be able to enter an amount and click `fund`. Our MetaMask pops up and has us sign the transaction, funding the contract with the amount we've entered! ```js async function fund() { const ethAmount = document.getElementById("ethAmount").value; console.log(`Funding with ${ethAmount}...`); if (typeof window.ethereum !== "undefined") { const provider = new ethers.BrowserProvider(window.ethereum); const signer = provider.getSigner(); const contract = new ethers.Contract(contractAddress, abi, signer); try { const transactionResponse = await contract.fund({ value: ethers.parseEther(ethAmount), }); await listenForTransactionMine(transactionResponse, provider); } catch (error) { console.log(error); } } else { fundButton.innerHTML = "Please install MetaMask"; } } ``` The function being called when we click this button is very similar in structure to the other we looked at. - look for `window.ethereum` - define our `provider` - acquire the `signer` (account credentials) - define the contract/target of our call - these are hardcoded for simplification purposes in this example and can be found in the [**constants.js**](https://github.com/Cyfrin/html-fund-me-cu/blob/main/constants.js) file of our [**html-fund-me repo**](https://github.com/Cyfrin/html-fund-me-cu). - submit transaction to the target contract with provided arguments. > **Note:** I'll stress again that this call being made by the front-end does **not** give the front-end access to private key data. The transaction is always sent to the wallet for confirmation/signing. ### Wrap Up We've learnt a lot about how browser wallets like MetaMask work under the hood and actually send our transactions to the blockchain. Great work - we've more low level concepts to cover in our next lesson.
Follow along the course with this video.
Browser Wallets
The first concept we need to grasp when working with a website in Web3 is that of a browser wallet - in our case MetaMask. It's through a wallet like MetaMask that we are able to interact with the blockchain and the Web3 ecosystem.
We can gain more insight into how this works by right-clicking our FundMe website and selecting inspect. You can also open this panel by pressing F12.

Navigate to the console tab of this panel. This tab contains a live JavaScript shell which houses a tonne of information about the browser we have open. Among this data is a JavaScript object, window.
By typing window and hitting enter the console will display this object and all of the functions it contains.
We should see something like this:

As seen in the image, there are some properties of this object which are not there by default, one of which is window.ethereum. It's through this property that a front end is able to interact with our wallet and it's accounts.
Try inspecting a browser without a browser wallet installed. You'll see that
window.ethereumdoesn't exist!
I recommend reading the MetaMask documentation on the window.ethereum object to learn more.
The Code
Alright, great. How does the code which interacts with all this look like? We can take a look at the index.js file in our html-fund-me repo for this.
One of the first things you'll see is a connect function. This is pretty ubiquitous and is how most Web3 websites are told Hey, I have a browser wallet, here are the accounts I want to use.
We see the first thing that this function does is checks for our window.ethereum object then connects and requests accounts.
Note: This request for accounts does not provide access to your private key. It allows the website to send transaction requests to your wallet in order for you to sign.
Let's look briefly at the HTML and how it calls this function.
The body of our index.html contains this button (among others) with the id connectButton.
Switching to our index.js we see this:
This grabs the element of the webpage by the id we set and then uses the onClick method to call our connect function!
Connecting in Action
Clicking on the Connect button on our html-fund-me front end, should trigger our MetaMask to pop up. From there we can select an account and click connect.

You'll know this works if your Connect button changes to Connected and an address is printed to your browser console.
Now you're ready to interact! The functions on our front-end example should look familiar. They're the same as the FundMe backend we built in the previous section.
Let's try calling getBalance and see how it works - if you're chain is currently set to Ethereum, you might actually get a balance.

When the getBalance button is clicked, this is the function we're calling on our front-end.
As before, we're checking for the existence of window.ethereum and then .. defining a provider.
RPC URLs and Providers
ethers is a javascript package that simplifies the use and interaction of browser wallets with our code.
What ethers.BrowserProvider(window.ethereum) is doing, is deriving the providers MetaMask is injecting into our window.ethereum object. The providers are the RPC URLs associated with the networks in our MetaMask account.

When we call functions on our front-end. We're effectively making API calls via the RPC URL to the blockchain.
Trying it Out
In order to get some experience trying this ourselves, we'll need to set up the backend of our project and import our anvil account into MetaMask.
Open your foundry-fund-me directory in VS Code and in your terminal run anvil.
This should spin up a local test chain for you. Copy one of the mock private keys it provides you in the terminal, we'll need this to import the account into our MetaMask wallet.
With this chain running, open a second terminal and run the command make deploy.
This will compile and deploy our FundMe project onto our locally running blockchain. Assuming you've not run into errors. That's all that's required to set up the back end.
Return to MetaMask, and within your network selector choose Add Network.

Select Add a network manually linked at the bottom of the served page.
In the subsequent page, inter your local network information as follows and click Save.
Next, we need to add one of our anvil accounts to the wallet!
Click the account displayed at the top of your MetaMask and select Add an account or hardware wallet from the bottom of the list.
You'll be prompted to add a new account, import an account, or add a hardware wallet. Select import an account and enter your previously copied mock private key into the field provided.

ALRIGHT. With all the set up done, we should be able to select our anvil chain in MetaMask, then select the account we just added and click the connect button.
If we click getBalance we should have 0 returned in our console reflecting the balance of our deployed contract. At this point, we should be able to enter an amount and click fund.
Our MetaMask pops up and has us sign the transaction, funding the contract with the amount we've entered!
The function being called when we click this button is very similar in structure to the other we looked at.
look for
window.ethereumdefine our
provideracquire the
signer(account credentials)define the contract/target of our call
these are hardcoded for simplification purposes in this example and can be found in the constants.js file of our html-fund-me repo.
submit transaction to the target contract with provided arguments.
Note: I'll stress again that this call being made by the front-end does not give the front-end access to private key data. The transaction is always sent to the wallet for confirmation/signing.
Wrap Up
We've learnt a lot about how browser wallets like MetaMask work under the hood and actually send our transactions to the blockchain. Great work - we've more low level concepts to cover in our next lesson.
Introduction to window.ethereum
A foundational guide to How Websites Interact with MetaMask - Discover how dApps securely communicate with your wallet via the injected `window.ethereum` provider object. Understand the process for detecting MetaMask, requesting connections, and initiating blockchain transactions.

2024 Update, we migrated the codebase on the Repo from ethers Version 5 to version 6.
Last updated on July 10, 2024
Course Overview
About the course
What you'll learn
Foundryup, Foundry Forge, and Anvil
Blockchain Oracles
How to create local Blockchain testnets
How to verify a smart contract
How to write and run smart contract tests
Course Description
Who is this course for?
- Software engineers
- Web3 developers
- Blockchain security researchers
Potential Careers
Security researcher
$49,999 - $120,000 (avg. salary)
Smart Contract Engineer
$100,000 - $150,000 (avg. salary)
Web3 developer
$60,000 - $150,000 (avg. salary)
Web3 Developer Relations
$85,000 - $125,000 (avg. salary)
Smart Contract Auditor
$100,000 - $200,000 (avg. salary)
Meet your instructors

Guest lecturers:


Last updated on February 1, 2026


Course Overview
About the course
What you'll learn
Foundryup, Foundry Forge, and Anvil
Blockchain Oracles
How to create local Blockchain testnets
How to verify a smart contract
How to write and run smart contract tests
Course Description
Who is this course for?
- Software engineers
- Web3 developers
- Blockchain security researchers
Potential Careers
Security researcher
$49,999 - $120,000 (avg. salary)
Smart Contract Engineer
$100,000 - $150,000 (avg. salary)
Web3 developer
$60,000 - $150,000 (avg. salary)
Web3 Developer Relations
$85,000 - $125,000 (avg. salary)
Smart Contract Auditor
$100,000 - $200,000 (avg. salary)
Meet your instructors
Guest lecturers:
Last updated on February 1, 2026