# Sending CCIP messages In the previous two lessons, we deployed three smart contracts. On the source chain (Sepolia): 1. `Sender`: To send the cross-chain message. On the destination chain (base Sepolia): 2. `Receiver`: to receive the cross-chain message. 3. `Vault`: into which we call `deposit` to deposit the USDC we sent from the `Sender` .contract to the `Receiver` contract using CCIP. Let's use these contracts to perform a token and data transfer cross-chain using CCIP. ## Fund the Sender with LINK We first need to fund our `Sender` contract with some LINK on Sepolia to pay the fees. Switch your network back to Sepolia in MetaMask. For this, we will follow the same steps as in Section 5 Lesson 5, so revisit that lesson if you need a recap of how to do this. From MetaMask, send `3` LINK to the `Sender` contract address:  ## Approve the Sender and Receiver contracts We need to approve both `Sender` and `Receiver` contracts to spend USDC: - `Sender`: so this contract can transfer the USDC from your wallet to itself, ready for the cross-chain transfer. - `Vault`: so it can send USDC from your EOA to itself when calling `deposit`. Let's do a quick recap on how to do this. ### Approving the Sender The `Sender` has been deployed to Sepolia, so we will use [Etherscan](https://sepolia.etherscan.io/) to perform this approval. 1. Head to the [USDC contract on Sepolia Etherscan](https://sepolia.etherscan.io/address/0x1c7D4B196Cb0C7B01d743Fbc6116a902379C7238) 2. Click on the **Contract** and then the **Write as Proxy** tabs. 3. Click **Connect to Web3** and connect your wallet: 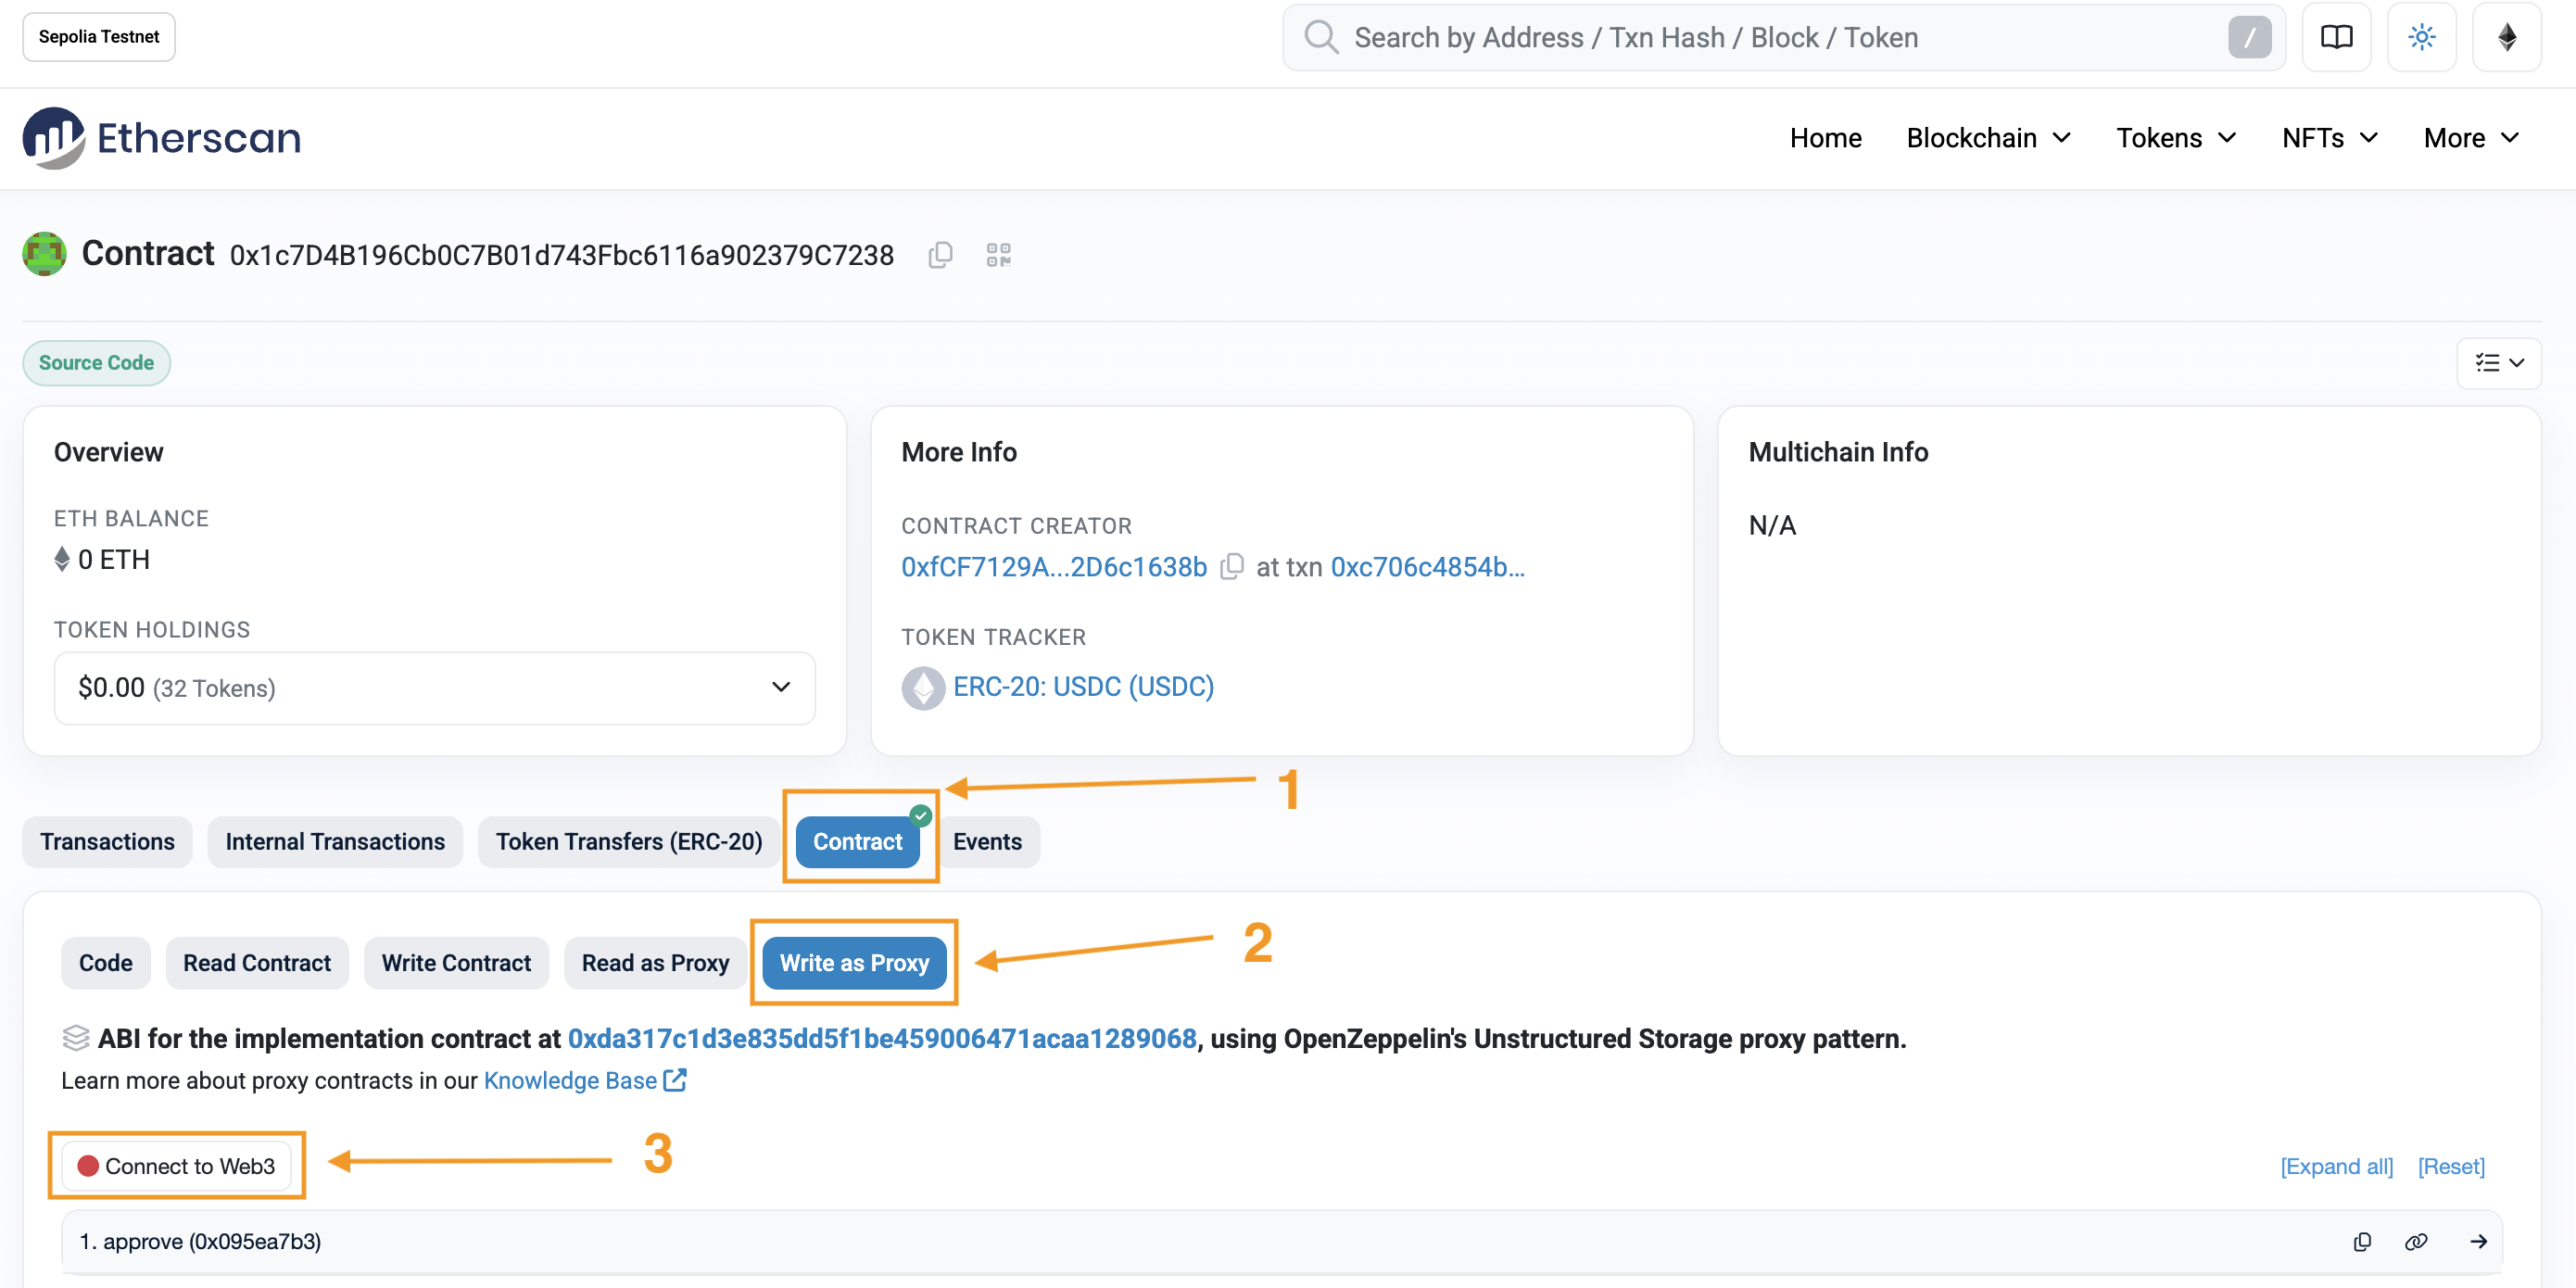 4. Click on the `approve` function: - Paste the `Sender` address as the `spender` - Set the `value` as `1000000` - 1 USDC - Click **Write** - Confirm the transaction in MetaMask 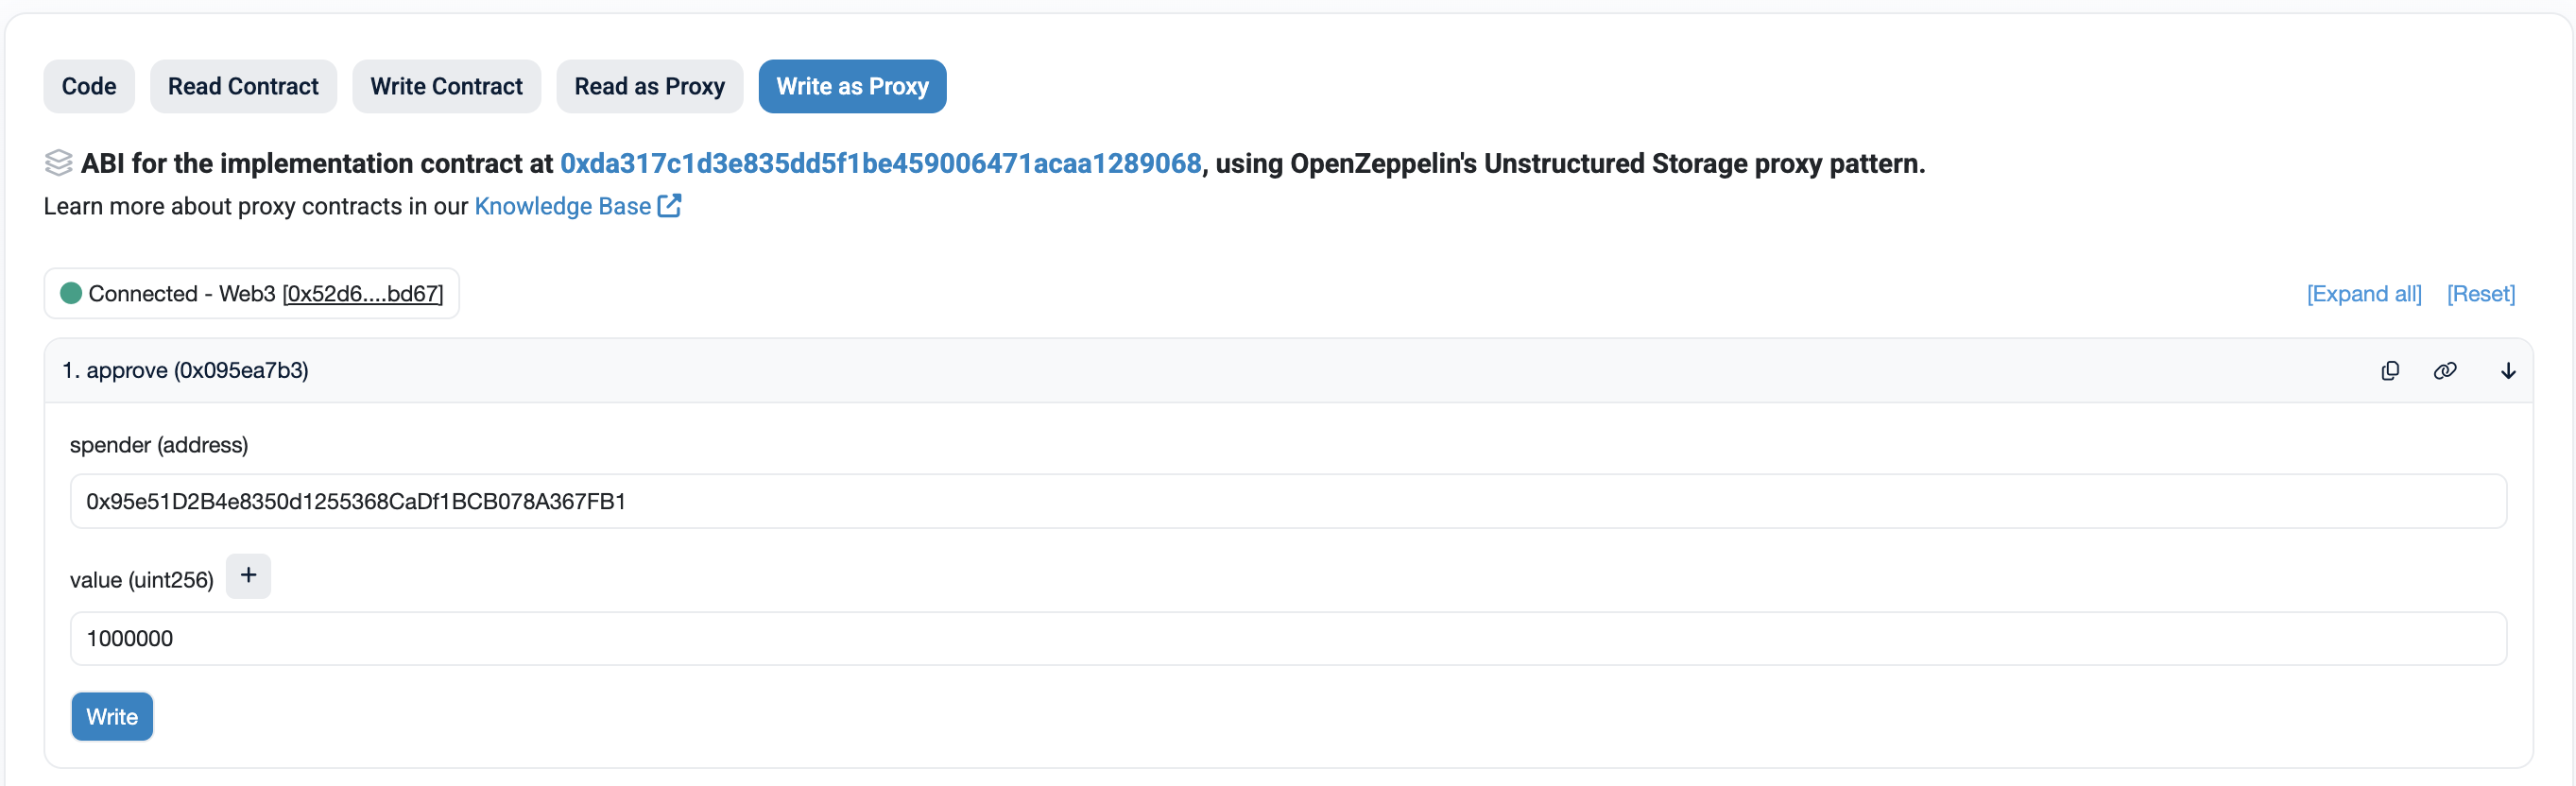 5. Confirm the `Sender` has been added as a spender by: - Clicking the **Read as Proxy** tab. - Clicking **Connect to Web3** and connecting your wallet. - Clicking the `allowance` function . - Pasting your MetaMask address as the `owner`. - Pasting the `Sender` address as the `spender`. - Clicking **Query**. - `1000000` will be returned if the `Sender` was successfully added as a spender. 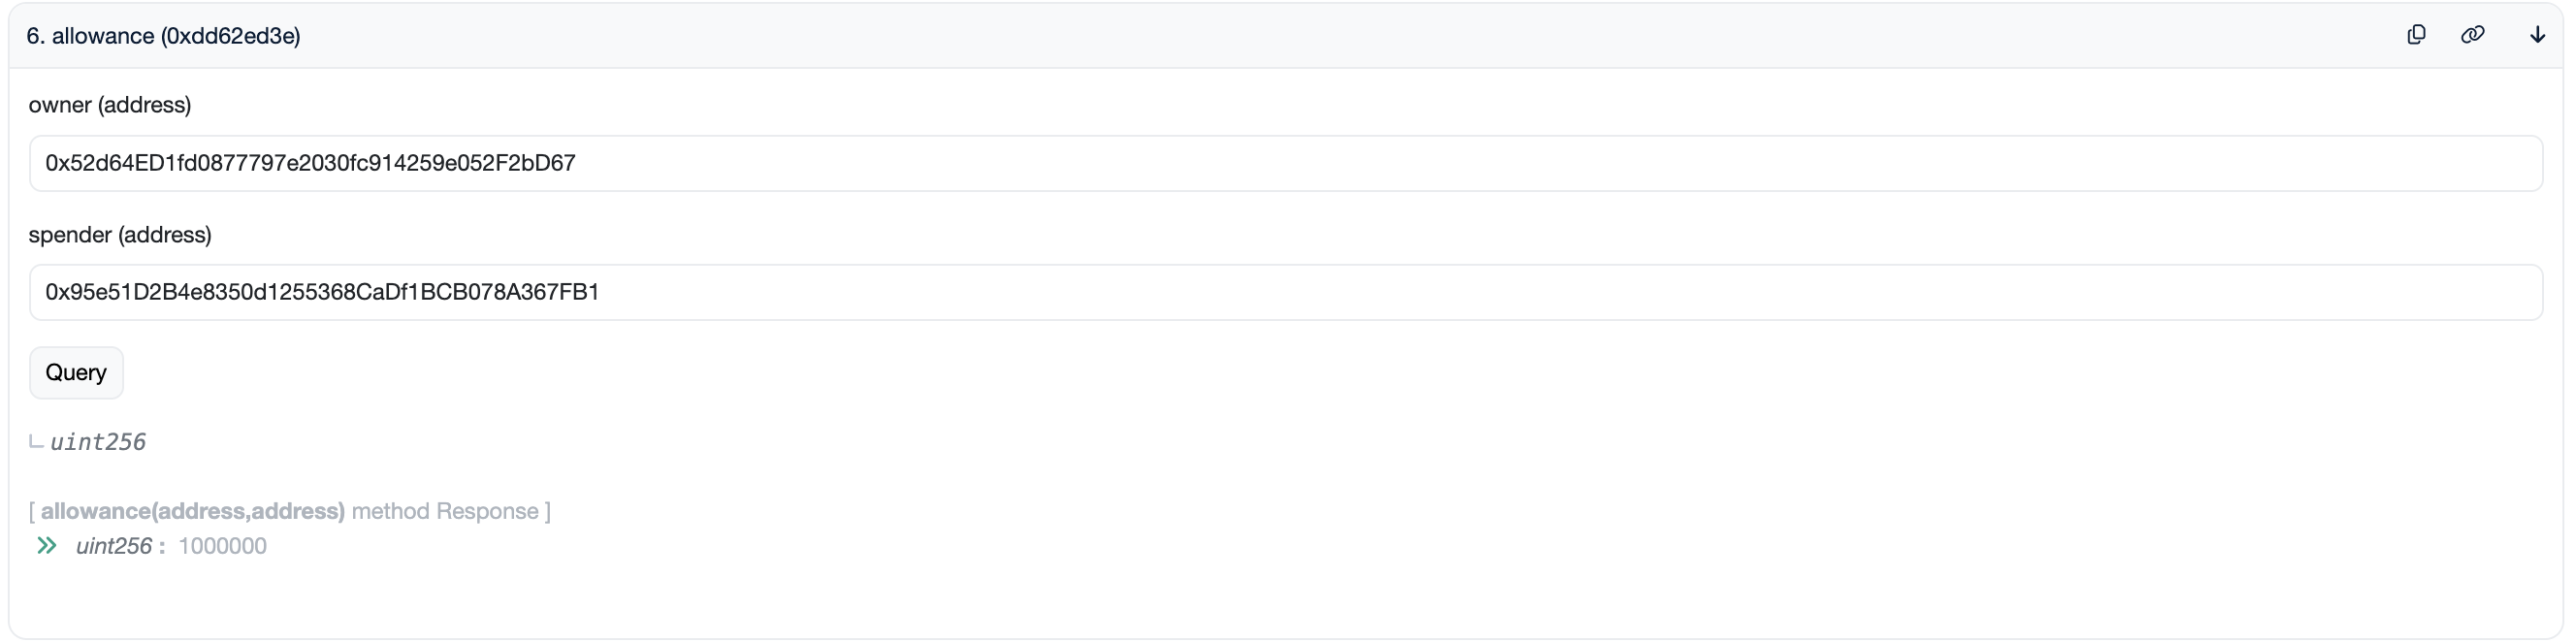 ### Approving the Vault The `Vault` has been deployed to Base Sepolia. So we will use [Basescan](https://sepolia.basescan.org/) to approve this contract. 1. Head to the [USDC contract on Base Sepolia](https://sepolia.basescan.org/address/0x036CbD53842c5426634e7929541eC2318f3dCF7e) 2. Click on the **Contract** and then the **Write as Proxy** tabs. 3. Click **Connect to Web3** and connect your wallet. 4. Click on the `approve` function: - Paste the `Vault` address as the `spender`. - Set the `value` as `1000000` - `1` USDC. - Click **Write**. - Confirm the transaction in MetaMask. 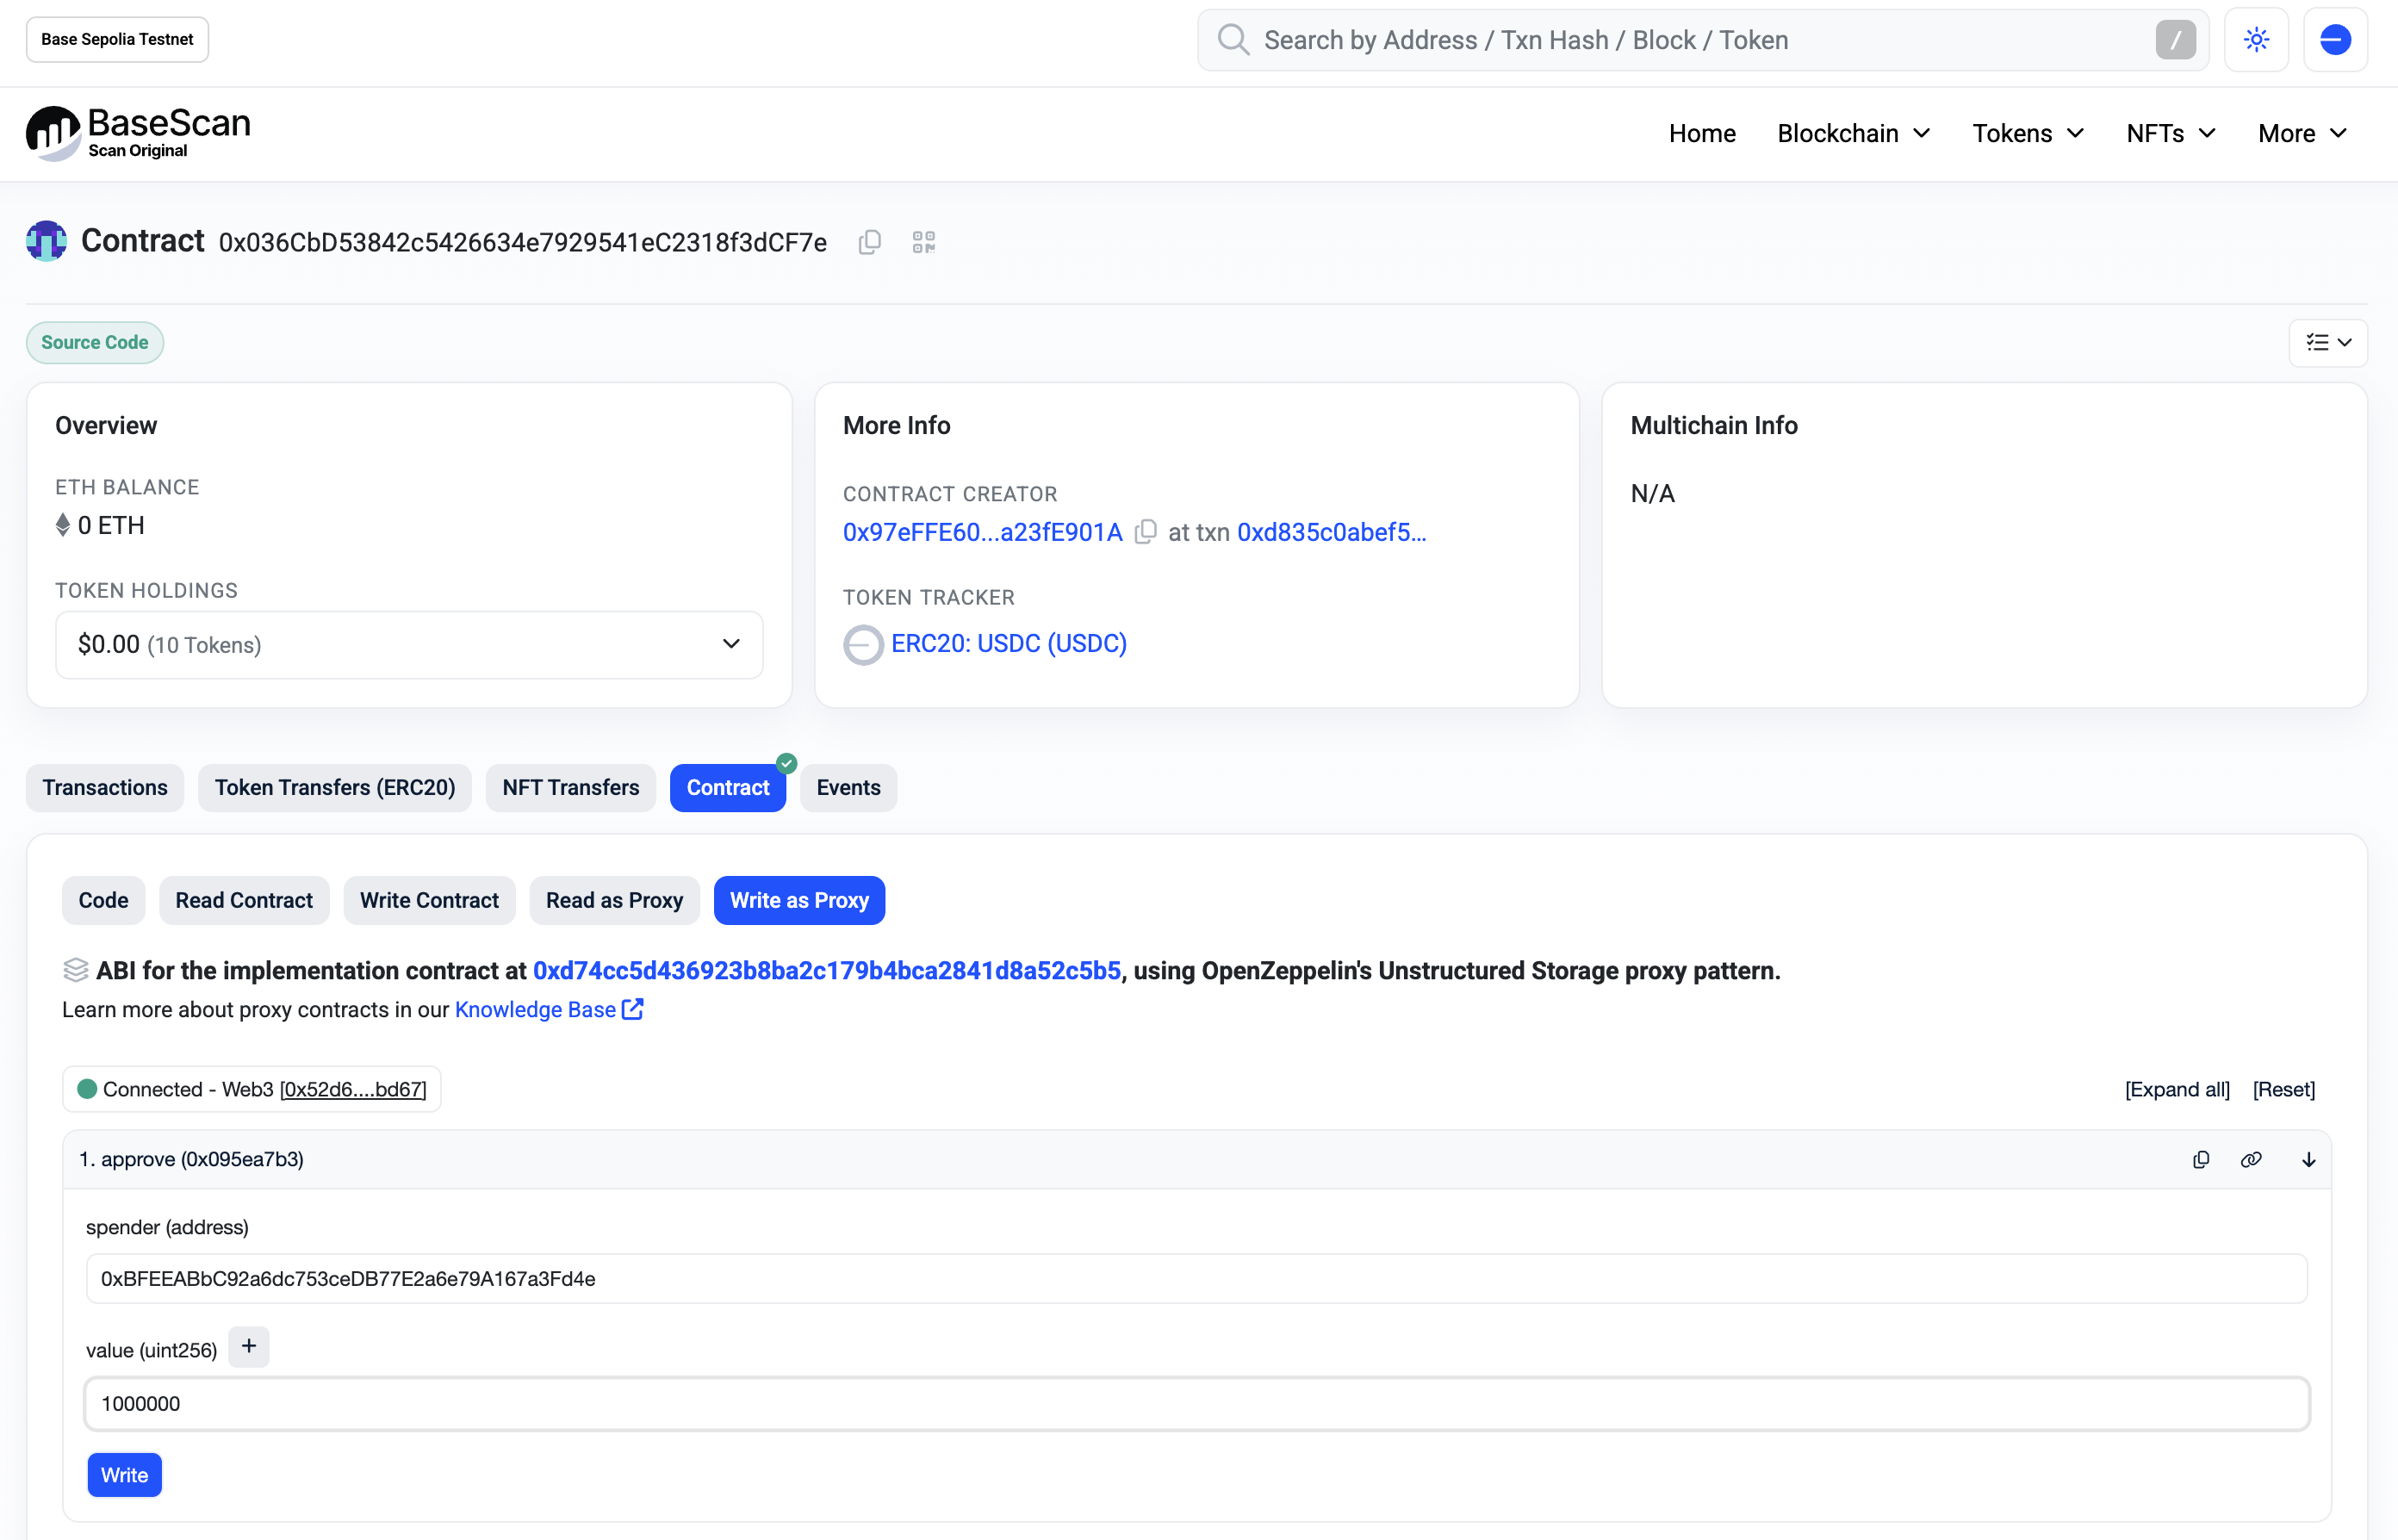 5. Confirm the `Vault` has been added as a spender by: - Clicking the **Read as Proxy** tab. - Clicking **Connect to Web3** and connecting your wallet. - Clicking the `allowance` function . - Paste your MetaMask address as the `owner` . - Pasting the `Vault` address as the `spender`. - Clicking **Query**. - `1000000` will be returned if the `Vault` was successfully added as a spender.  ## Sending the cross-chain message FINALLY! We are ready to send the cross-chain message! - Head back to Remix. - Switch back to Sepolia in MetaMask. - Expand the `Sender` contract dropdown, click on the `transferTokens` function, and enter the following function parameters: - `_receiver`: the `Receiver` contract address. - `_amount`: `1000000`. - `_target`: the `Vault` contract address. - Click **transact** and sign the transaction in MetaMask to send the message cross-chain: 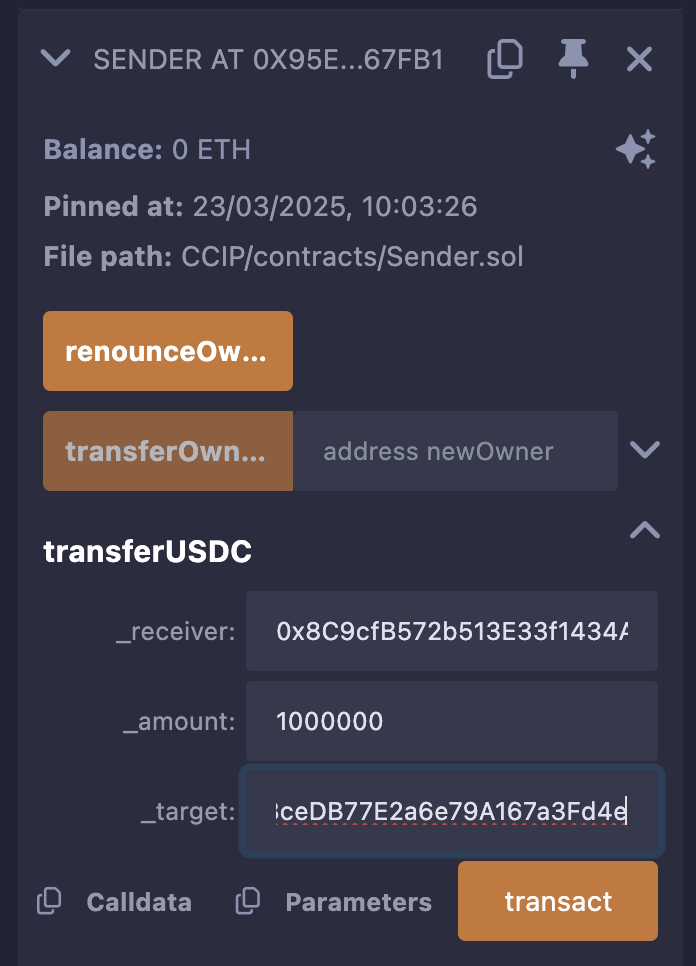 - Once your transaction has confirmed on Sepolia, copy the transaction hash:  - Head to the [CCIP Explorer](https://ccip.chain.link/) and paste the transaction hash to see the status of your CCIP message: 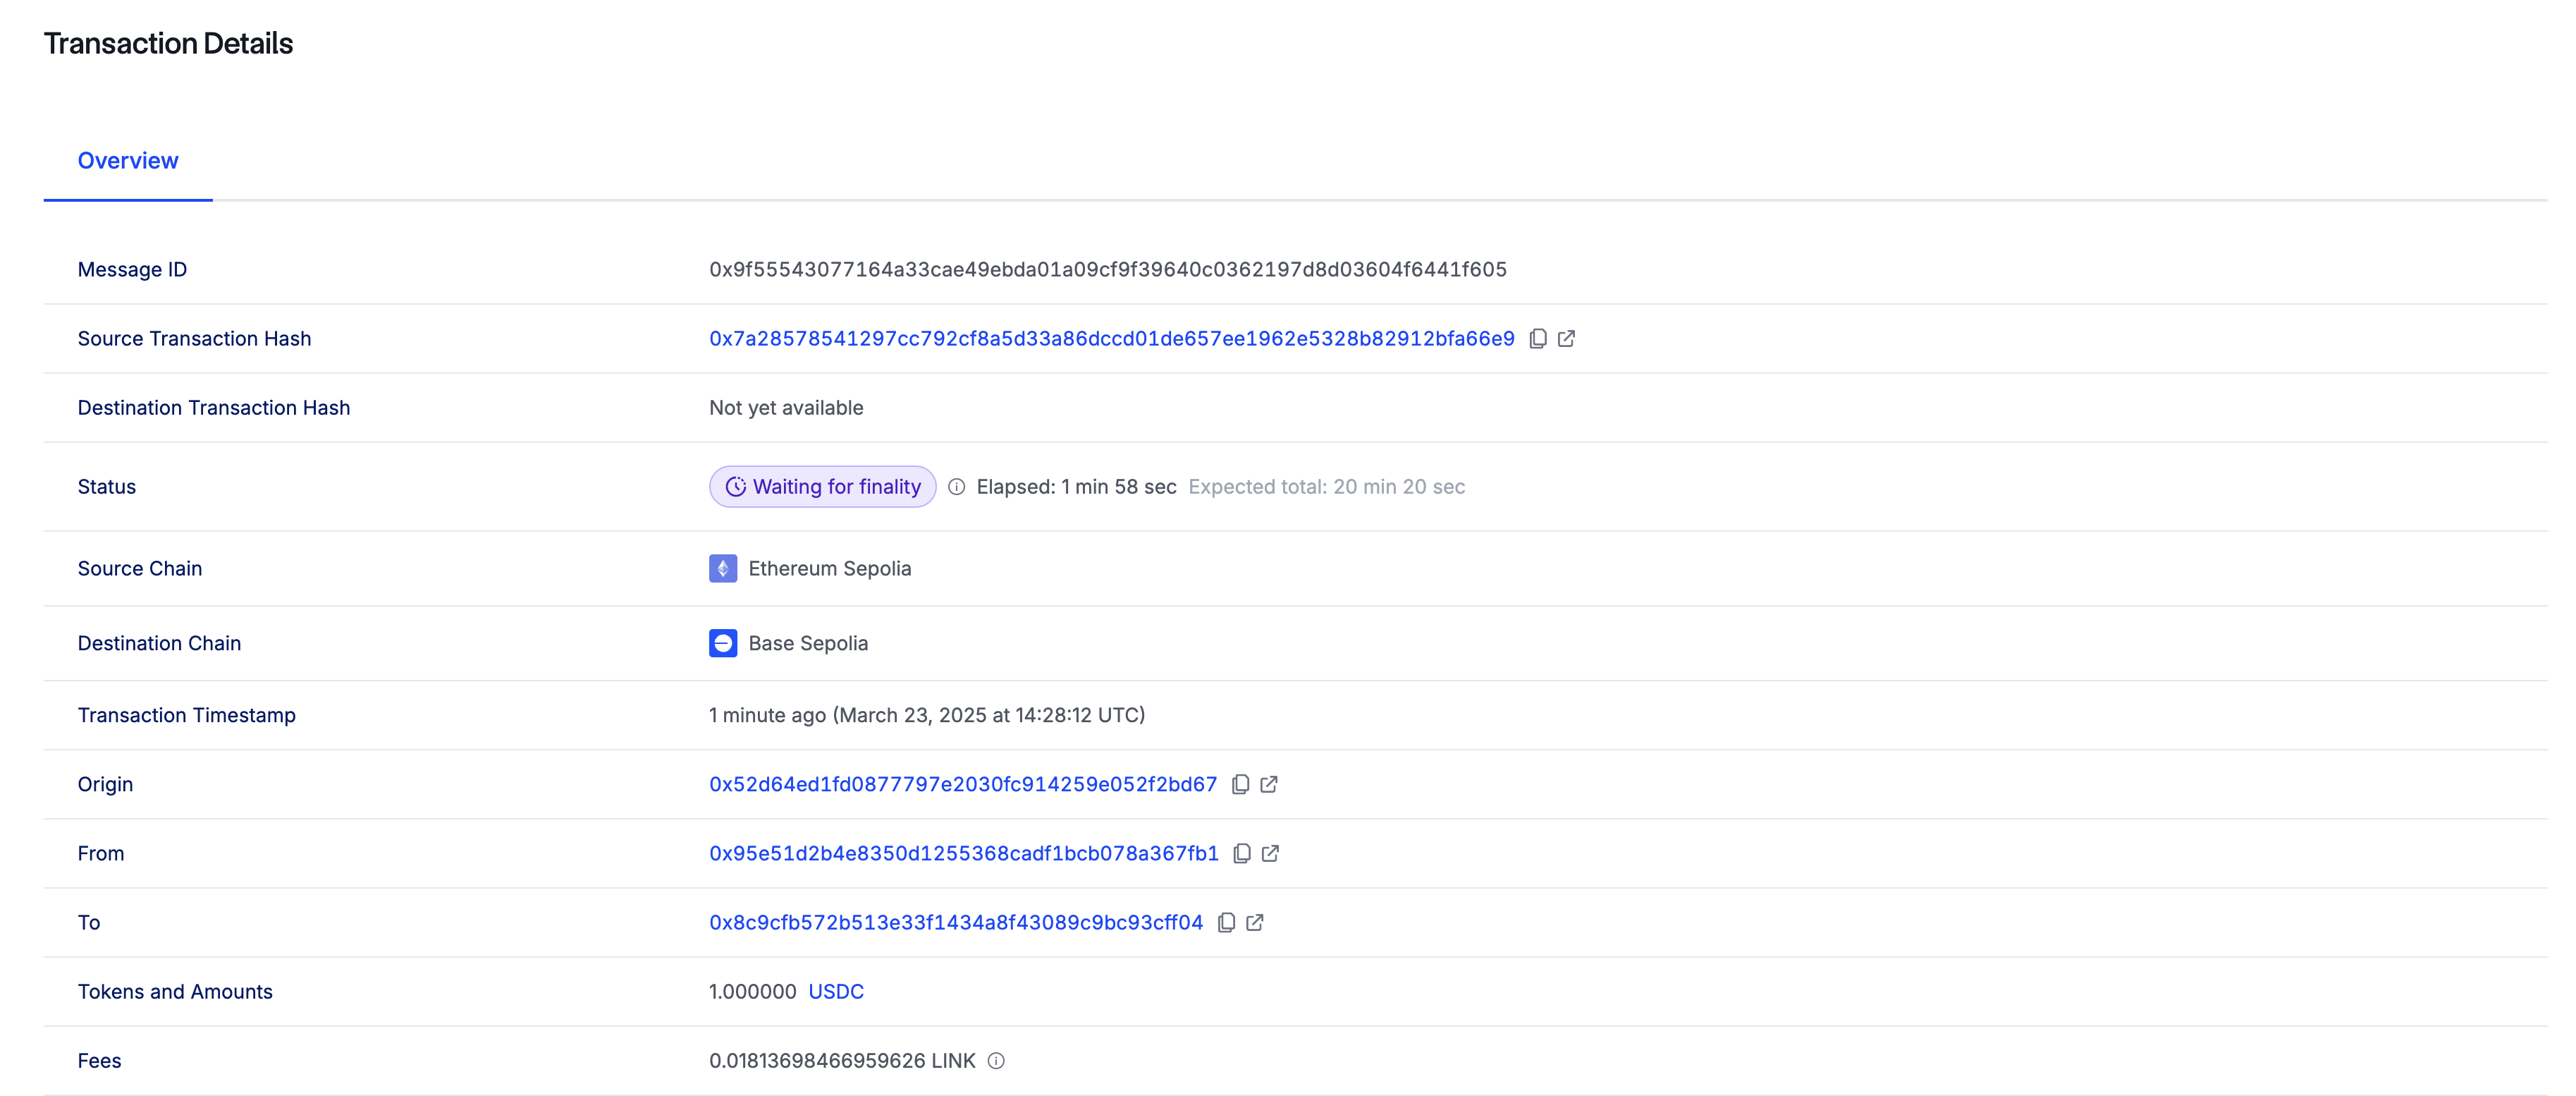 - Once finality has been reached, you will see the status in the CCIP explorer: 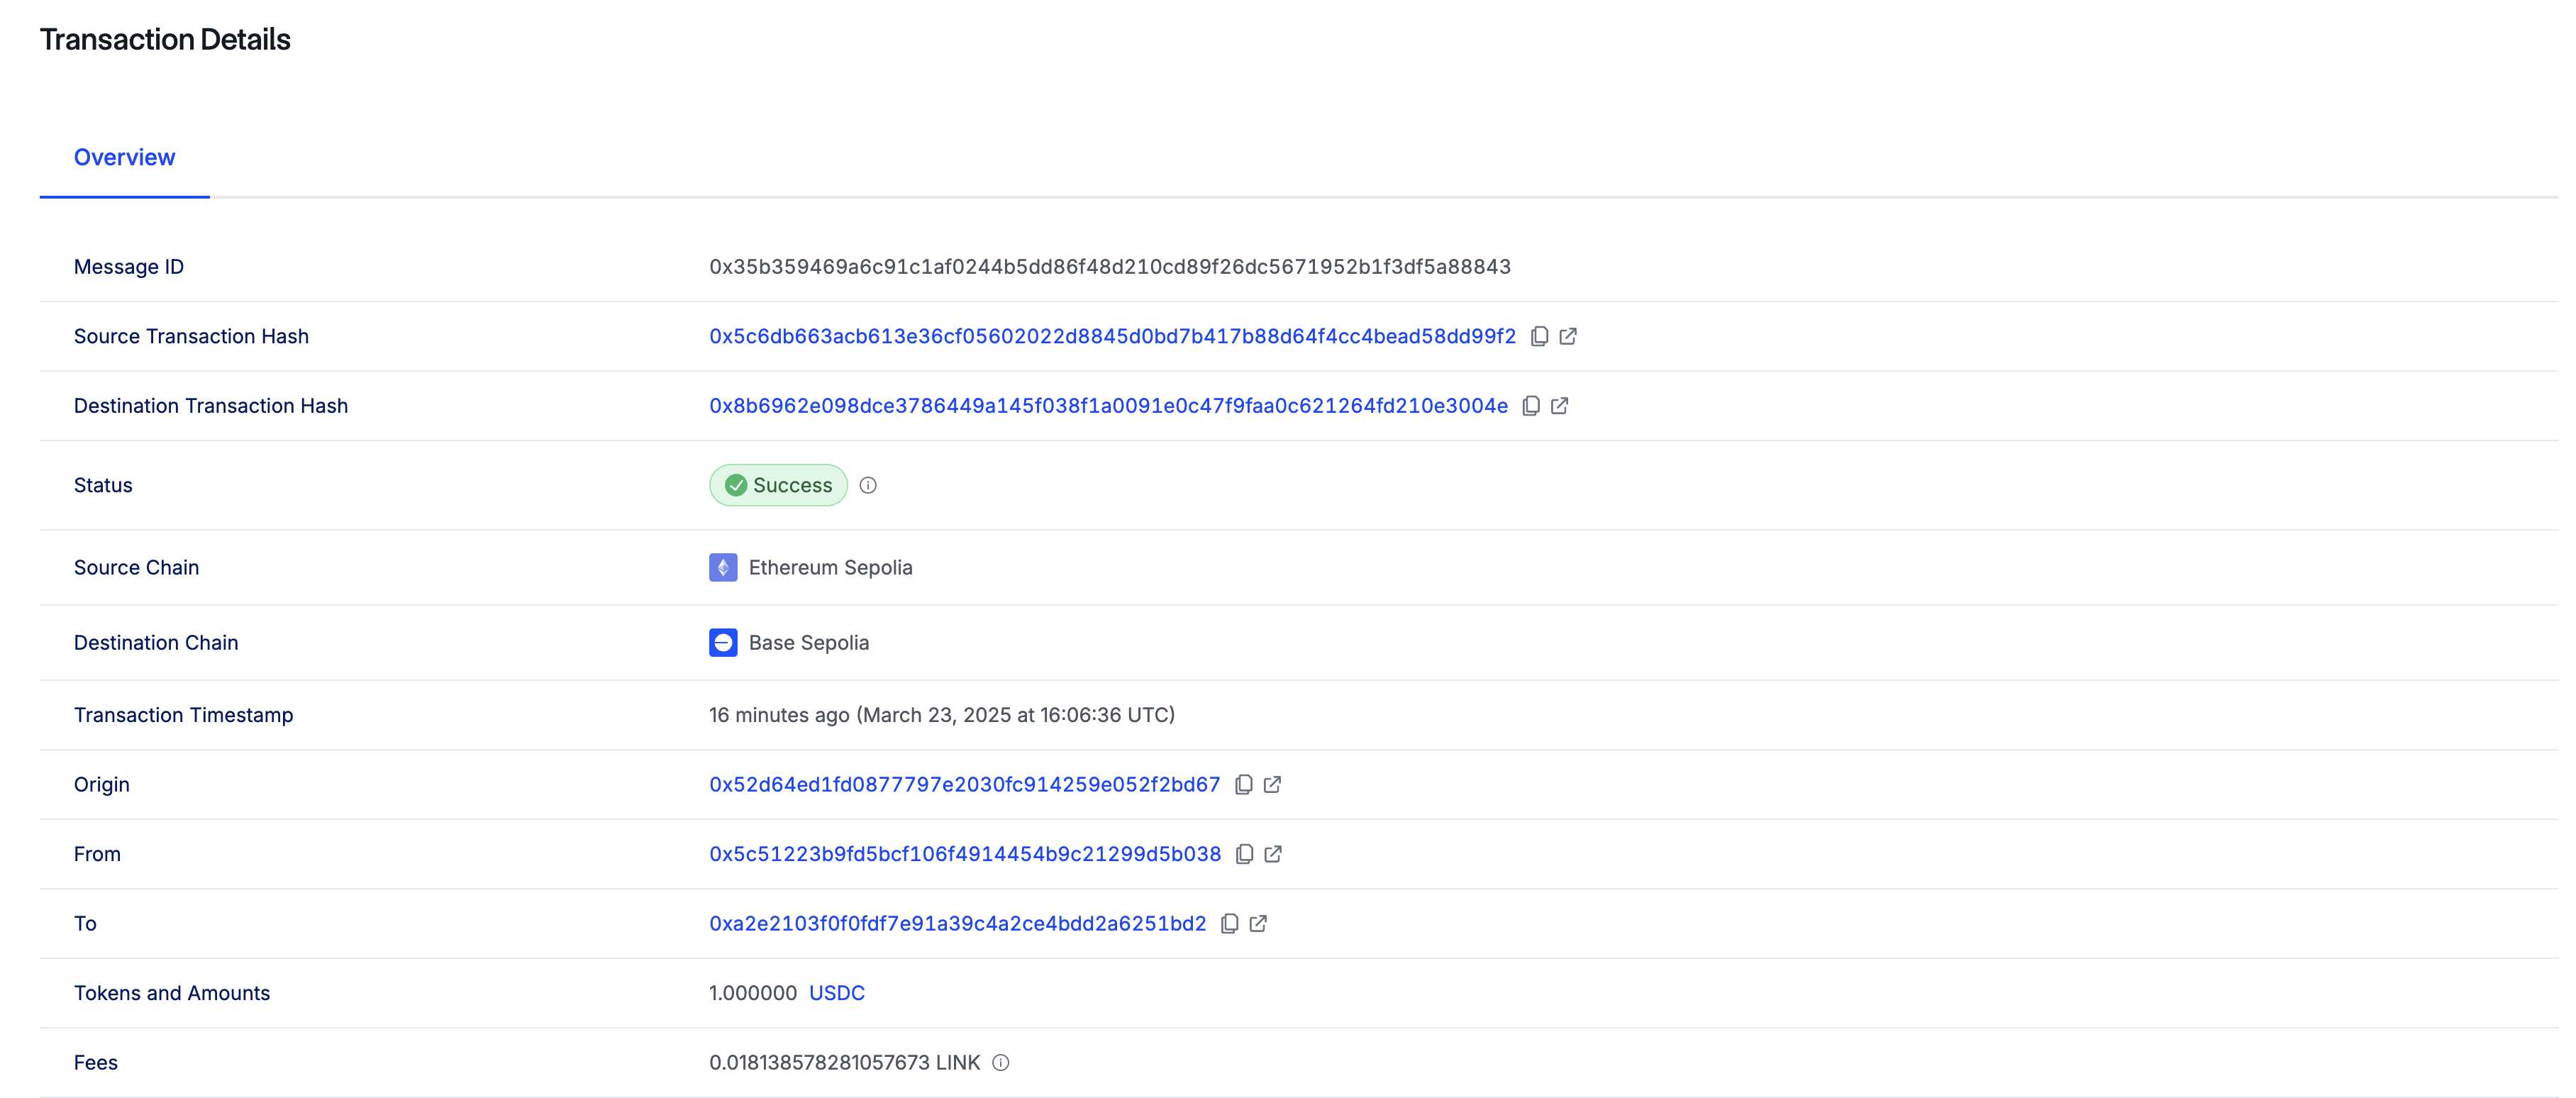 ## Checking the data was executed Let's check that the USDC was successfully automatically deposited into the vault. - In MetaMask, connect to Base Sepolia. - Expand the `Vault` contract dropdown in the **Deployed Contracts** section and find the `balances` function. - Paste your MetaMask address as the `address` and click **balances**. - If the data has been successfully executed, `1000000` will be returned:  This was a very challenging lesson so great job at getting to the end! I recommend you take a break here to digest all of that information before moving onto the next section. ## Challenge! So now you know how to write a smart contract to bridge USDC tokens from Sepolia to Base Sepolia, the next challenge is to use this same smart contract to transfer [CCIP-BnM](https://sepolia.etherscan.io/token/0xfd57b4ddbf88a4e07ff4e34c487b99af2fe82a05#writeContract) tokens to ZKsync Sepolia and automatically send the tokens to a vault! To do this you will need to: 1. Add the ZKsync Sepolia chain to MetaMask. 2. Add the CCIP-BnM token on Sepolia and ZKsync Sepolia to Metamask. 3. Modify and re-deploy the `Sender` smart contract: - `DESTINATION_CHAIN_SELECTOR` to be the [selector for ZKsync Sepolia](https://docs.chain.link/ccip/directory/testnet/chain/ethereum-testnet-sepolia-zksync-1). - Change the token to be [CCIP-BnM](https://sepolia.etherscan.io/token/0xfd57b4ddbf88a4e07ff4e34c487b99af2fe82a05#writeContract) rather than USDC. - (dev-only challenge): Can you modify the smart contracts to allow the function caller to specify the token and destination chain? 4. Modify the `Vault` smart contract - Change the token to be [CCIP-BnM](https://sepolia.etherscan.io/token/0xfd57b4ddbf88a4e07ff4e34c487b99af2fe82a05#writeContract) rather than USDC. - (dev-only challenge): Can you modify the `Vault` to allow an owner to be able to add allowed tokens? 6. Re-deploy the `Receiver` and `Vault` smart contracts: - To do this, you will need to use the Remix ZKsync plugin to compile and deploy your smart contract! - Simply click on the plugins tab on the bottom of the left sodebar, type "zksync" into the search bar and then click **Activate** on the plugin. It will now be available in the sidebar. - If you get stuck, [this lesson on Updraft](https://updraft.cyfrin.io/courses/solidity/simple-storage/zksync-plugin) will take you through using the ZKsync plugin step-by step. - You will also need to get some Zksync Sepolia ETH to pay for the gas. Watch [this Updraft lesson](https://updraft.devcyfrin.com/courses/blockchain-basics/basics/making-your-first-transaction-on-zksync) if you need a refresher of how to do this. 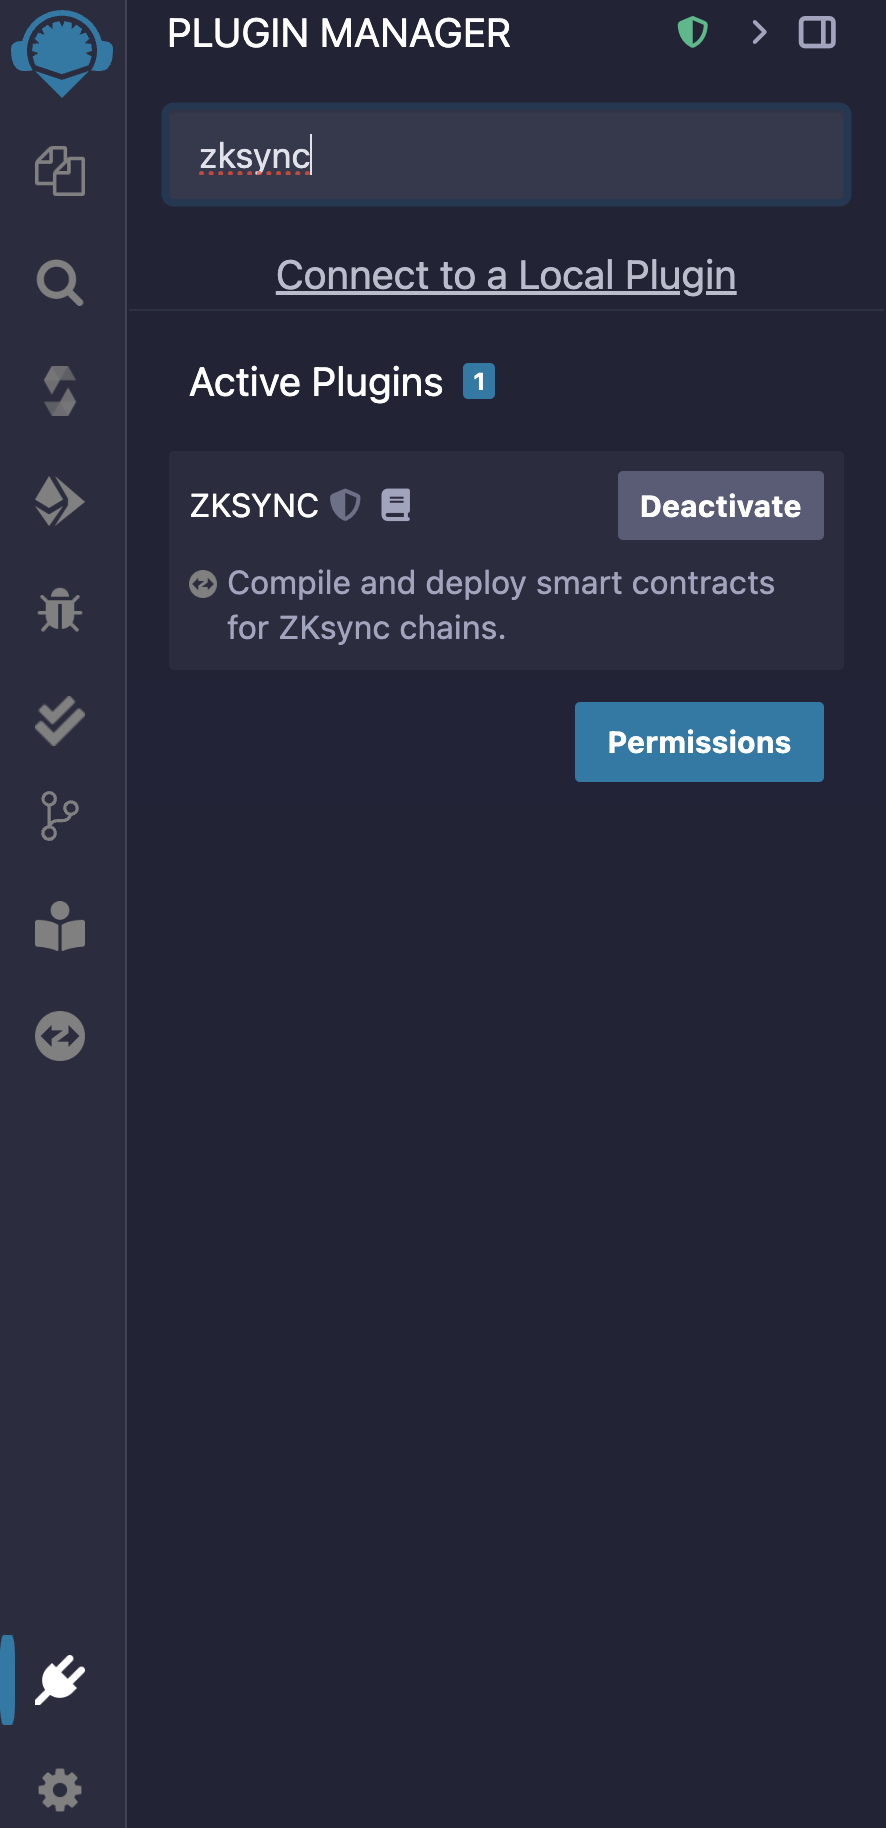 7. Get some test CCIP tokens (CCIP-BnM for Burn and Mint) by [calling `drip()` on the token contract using Etherscan](https://sepolia.etherscan.io/token/0xfd57b4ddbf88a4e07ff4e34c487b99af2fe82a05#writeContract). 9. Call `transferTokens` as before and check the CCIP explorer to check the status of your cross-chain transfer. 10. Check your balance of ZKsync Sepolia CCIP-BnM tokens has now increased in the Vault! See how awesome it is to deploy contracts and transfer your tokens cross-chain to ZKsync Speolia and automatically perform actions! Extra cookies for you if you managed the extra challenge:)
Sending CCIP messages
In the previous two lessons, we deployed three smart contracts.
On the source chain (Sepolia):
Sender: To send the cross-chain message.
On the destination chain (base Sepolia):
Receiver: to receive the cross-chain message.Vault: into which we calldepositto deposit the USDC we sent from theSender.contract to theReceivercontract using CCIP.
Let's use these contracts to perform a token and data transfer cross-chain using CCIP.
Fund the Sender with LINK
We first need to fund our Sender contract with some LINK on Sepolia to pay the fees.
Switch your network back to Sepolia in MetaMask.
For this, we will follow the same steps as in Section 5 Lesson 5, so revisit that lesson if you need a recap of how to do this.
From MetaMask, send 3 LINK to the Sender contract address:

Approve the Sender and Receiver contracts
We need to approve both Sender and Receiver contracts to spend USDC:
Sender: so this contract can transfer the USDC from your wallet to itself, ready for the cross-chain transfer.Vault: so it can send USDC from your EOA to itself when callingdeposit.
Let's do a quick recap on how to do this.
Approving the Sender
The Sender has been deployed to Sepolia, so we will use Etherscan to perform this approval.
Head to the USDC contract on Sepolia Etherscan
Click on the Contract and then the Write as Proxy tabs.
Click Connect to Web3 and connect your wallet:

Click on the
approvefunction:Paste the
Senderaddress as thespenderSet the
valueas1000000- 1 USDCClick Write
Confirm the transaction in MetaMask

Confirm the
Senderhas been added as a spender by:Clicking the Read as Proxy tab.
Clicking Connect to Web3 and connecting your wallet.
Clicking the
allowancefunction .Pasting your MetaMask address as the
owner.Pasting the
Senderaddress as thespender.Clicking Query.
1000000will be returned if theSenderwas successfully added as a spender.

Approving the Vault
The Vault has been deployed to Base Sepolia. So we will use Basescan to approve this contract.
Head to the USDC contract on Base Sepolia
Click on the Contract and then the Write as Proxy tabs.
Click Connect to Web3 and connect your wallet.
Click on the
approvefunction:Paste the
Vaultaddress as thespender.Set the
valueas1000000-1USDC.Click Write.
Confirm the transaction in MetaMask.

Confirm the
Vaulthas been added as a spender by:Clicking the Read as Proxy tab.
Clicking Connect to Web3 and connecting your wallet.
Clicking the
allowancefunction .Paste your MetaMask address as the
owner.Pasting the
Vaultaddress as thespender.Clicking Query.
1000000will be returned if theVaultwas successfully added as a spender.

Sending the cross-chain message
FINALLY! We are ready to send the cross-chain message!
Head back to Remix.
Switch back to Sepolia in MetaMask.
Expand the
Sendercontract dropdown, click on thetransferTokensfunction, and enter the following function parameters:_receiver: theReceivercontract address._amount:1000000._target: theVaultcontract address.
Click transact and sign the transaction in MetaMask to send the message cross-chain:

Once your transaction has confirmed on Sepolia, copy the transaction hash:

Head to the CCIP Explorer and paste the transaction hash to see the status of your CCIP message:

Once finality has been reached, you will see the status in the CCIP explorer:

Checking the data was executed
Let's check that the USDC was successfully automatically deposited into the vault.
In MetaMask, connect to Base Sepolia.
Expand the
Vaultcontract dropdown in the Deployed Contracts section and find thebalancesfunction.Paste your MetaMask address as the
addressand click balances.If the data has been successfully executed,
1000000will be returned:

This was a very challenging lesson so great job at getting to the end! I recommend you take a break here to digest all of that information before moving onto the next section.
Challenge!
So now you know how to write a smart contract to bridge USDC tokens from Sepolia to Base Sepolia, the next challenge is to use this same smart contract to transfer CCIP-BnM tokens to ZKsync Sepolia and automatically send the tokens to a vault!
To do this you will need to:
Add the ZKsync Sepolia chain to MetaMask.
Add the CCIP-BnM token on Sepolia and ZKsync Sepolia to Metamask.
Modify and re-deploy the
Sendersmart contract:DESTINATION_CHAIN_SELECTORto be the selector for ZKsync Sepolia.Change the token to be CCIP-BnM rather than USDC.
(dev-only challenge): Can you modify the smart contracts to allow the function caller to specify the token and destination chain?
Modify the
Vaultsmart contractChange the token to be CCIP-BnM rather than USDC.
(dev-only challenge): Can you modify the
Vaultto allow an owner to be able to add allowed tokens?
Re-deploy the
ReceiverandVaultsmart contracts:To do this, you will need to use the Remix ZKsync plugin to compile and deploy your smart contract!
Simply click on the plugins tab on the bottom of the left sodebar, type "zksync" into the search bar and then click Activate on the plugin. It will now be available in the sidebar.
If you get stuck, this lesson on Updraft will take you through using the ZKsync plugin step-by step.
You will also need to get some Zksync Sepolia ETH to pay for the gas. Watch this Updraft lesson if you need a refresher of how to do this.

Get some test CCIP tokens (CCIP-BnM for Burn and Mint) by calling
drip()on the token contract using Etherscan.Call
transferTokensas before and check the CCIP explorer to check the status of your cross-chain transfer.Check your balance of ZKsync Sepolia CCIP-BnM tokens has now increased in the Vault!
See how awesome it is to deploy contracts and transfer your tokens cross-chain to ZKsync Speolia and automatically perform actions!
Extra cookies for you if you managed the extra challenge:)
Sending CCIP Messages
A practical walkthrough to Sending CCIP messages - Execute a cross-chain token and data transfer using Chainlink CCIP, covering funding the sender, approving token spending, and initiating the transfer via Remix.

Course Overview
About the course
What you'll learn
Smart contract and Solidity fundamentals
Chainlink’s decentralized oracle network (DON)
Chainlink Data Feeds
Chainlink Data Streams
Chainlink Automation
Chainlink CCIP
Chainlink Functions
Verifiable Random Function (VRF)
Chainlink Proof of Reserve
Course Description
Who is this course for?
- Smart Contract Developers
- Solutions Architects
- Blockchain Engineers
- Web3 Developers
- Security Researchers
Potential Careers
Smart Contract Engineer
$100,000 - $150,000 (avg. salary)
DeFi Developer
$75,000 - $200,000 (avg. salary)
Web3 developer
$60,000 - $150,000 (avg. salary)
Web3 Developer Relations
$85,000 - $125,000 (avg. salary)
Smart Contract Auditor
$100,000 - $200,000 (avg. salary)
Security researcher
$49,999 - $120,000 (avg. salary)
Blockchain Financial Analyst
$100,000 - $150,000 (avg. salary)


Last updated on July 25, 2025

Certification: Chainlink Fundamentals
The Chainlink Fundamentals proficiency exam covers is designed to confirm your grasp of all key concepts and learnings presented in the course material. Exam takers will have 75 minutes to complete 50 questions and must score 30/50 to pass and earn a Certificate of Completion. Because course material is continually updated, The Chainlink Fundamentals Certificate of Completions expires after 1 year. To remain current, holders must re-take the exam and pass to confirm their current knowledge.

Course Overview
About the course
What you'll learn
Smart contract and Solidity fundamentals
Chainlink’s decentralized oracle network (DON)
Chainlink Data Feeds
Chainlink Data Streams
Chainlink Automation
Chainlink CCIP
Chainlink Functions
Verifiable Random Function (VRF)
Chainlink Proof of Reserve
Course Description
Who is this course for?
- Smart Contract Developers
- Solutions Architects
- Blockchain Engineers
- Web3 Developers
- Security Researchers
Potential Careers
Smart Contract Engineer
$100,000 - $150,000 (avg. salary)
DeFi Developer
$75,000 - $200,000 (avg. salary)
Web3 developer
$60,000 - $150,000 (avg. salary)
Web3 Developer Relations
$85,000 - $125,000 (avg. salary)
Smart Contract Auditor
$100,000 - $200,000 (avg. salary)
Security researcher
$49,999 - $120,000 (avg. salary)
Blockchain Financial Analyst
$100,000 - $150,000 (avg. salary)
Last updated on July 25, 2025