# Using Chainlink Local In this lesson, instead of using CCIP on a live testnet, we will use Chainlink Local to test sending a cross-chain message with CCIP. We will test CCIP using Chainlink Local in Remix. We will send a simple string message cross-chain, e.g., `"Hey There!"` Let's get started! ## The MessageSender and MessageReceiver contracts In this lesson, we will write and test, using Chainlink local, two contracts: 1. `MessageSender`: This contract would be deployed to the source chain. It will contain the logic to send the CCIP message, similar to the contract we wrote in Section 5. 2. `MessageReceiver`: This contract will receive the cross-chain message. It will inherit the `CCIPReceiver` abstract contract needed to receive CCIP messages. This means it must implement the required `_ccipReceive` function to process the cross-chain message. Note: The imports in these contracts require you to use a compiler version of `0.8.20` or higher. ## The MessageSender contract In Remix, inside the "CCIP" workspace you created in Section 5, create a new folder called `chainlink-local` and inside the folder, create a new file called `MessageSender.sol`. Copy and paste the code from the [course code repo](https://github.com/Cyfrin/chainlink-fundamentals-cu/blob/main/chainlink-course-code/ccip/chainlink-local/MessageSender.sol) into the `MessageSender.sol` file. As always, feel free to skip the code explainer and jump straight to deploying if you aren't interested in learning how to implement CCIP. ### Code explainer The logic of this contract is very similar to that of Section 5, so we will keep things high level. The main things to note are: - The LINK token and Router are set **dynamically** in the constructor rather than hard-coded. This is because we need to pass these through from Chainlink Local, which we will do shortly. - `sendMessage` sends the CCIP message. This contains the same logic as before, except no tokens are added to the tokens array, and a string, `"Hey there!"` is abi encoded and passed to the `data` part of the `Any2EVMMessage` struct: ```solidity Client.EVM2AnyMessage memory evm2AnyMessage = Client.EVM2AnyMessage({ receiver: abi.encode(receiver), data: abi.encode("Hey there!"), // ABI-encoded string tokenAmounts: new Client.EVMTokenAmount[](0), // Empty array indicating no tokens are being sent extraArgs: Client._argsToBytes( Client.EVMExtraArgsV2({ gasLimit: 200_000, // Gas limit for the callback on the destination chain allowOutOfOrderExecution: true // Allows the message to be executed out of order relative to other messages from the same sender }) ), // Set the feeToken address, indicating LINK will be used for fees feeToken: address(s_linkToken) }); ``` You'll also notice that we now have a non-zero `gasLimit`. This is because this `gasLimit` is used to execute `_ccipReceive`, which will be implemented on the `MessageReceiver` contract. ## The Message Receiver contract In Remix still, still inside the "CCIP" workspace you created in Section 5, create a new file called `MessageReceiver.sol` inside the `chainlink-local` folder from before, copy and paste the code from the [course code repo](https://github.com/Cyfrin/chainlink-fundamentals-cu/blob/main/chainlink-course-code/ccip/chainlink-local/MessageReceiver.sol) into the `MessageReceiver.sol` file. ### Code explainer #### Imports ```solidity import {Client} from "@chainlink/contracts-ccip@1.5.0/src/v0.8/ccip/libraries/Client.sol"; import {CCIPReceiver} from "@chainlink/contracts-ccip@1.5.0/src/v0.8/ccip/applications/CCIPReceiver.sol"; ``` - `Client`: Library providing the struct for CCIP messages. - `CCIPReceiver`: Abstract contract that handles CCIP message receiving logic. The contract inherits this contract. #### State variables ```solidity bytes32 private s_lastReceivedMessageId; string private s_lastReceivedText; ``` - `s_lastReceivedMessageId`: stores the ID of the last received message. - `s_lastReceivedText`: stores the content (text) of the last received message. #### Constructor ```solidity constructor(address router) CCIPReceiver(router) {} ``` - Takes a router address as a parameter. - Passes this address to the parent `CCIPReceiver` contract constructor. - Remember from the previous section that the Router is the Chainlink CCIP contract that routes messages between chains. #### Message receiving logic ```solidity function _ccipReceive( Client.Any2EVMMessage memory any2EvmMessage ) internal override { s_lastReceivedMessageId = any2EvmMessage.messageId; s_lastReceivedText = abi.decode(any2EvmMessage.data, (string)); emit MessageReceived( any2EvmMessage.messageId, any2EvmMessage.sourceChainSelector, abi.decode(any2EvmMessage.sender, (address)), abi.decode(any2EvmMessage.data, (string)) ); } ``` - This function is defined on `CCIPReceiver` but not implemented. - Called automatically when a CCIP message is received. - Updates state variables with the message details. - Decodes the message data into a string using `abi.decode`. - Emits a `MessageReceived` event with the message details. #### Message getter function ```solidity function getLastReceivedMessageDetails() external view returns (bytes32 messageId, string memory text) { return (s_lastReceivedMessageId, s_lastReceivedText); } ``` - Public function to retrieve the last received message details. - Returns both the message ID and its text content. ## Create the CCIP Local Simulator contract To use Chainlink Local in Remix, we need to use the `CCIPLocalSimulator` helper contract. Create a file called `CCIPLocalSimulator.sol` in the `contracts` folder and paste the following code: ```solidity // SPDX-License-Identifier: MIT pragma solidity 0.8.24; // solhint-disable no-unused-import import {CCIPLocalSimulator} from "@chainlink/local/src/ccip/CCIPLocalSimulator.sol"; ``` Here, we have just imported the `CCIPLocalSimulator` contract so we can deploy it locally and use it in our testing. ## Deploy the contracts Let's now test sending a cross-chain message from the `MessageSender` contract to the `MessageReceiver` contract using Chainlink Local. ### Deploy the CCIPLocalSimulator Let's deploy the `CCIPLocalSimulator` contract. Behind the scenes, this contract will deploy some mock contracts for us so that we can simulate the cross-chain message transfer. These contracts from the on-chain CCIP intra. So far, in this course, we have exclusively deployed to a live testnet by connecting MetaMask using the **Injected provider—MetaMask** **Environment** option. This time, we want to deploy to Remix's local node - **Rexmix VM (Cancun)**. 1. In the **Deploy & run transactions** tab click the **Environments** dropdown and select **Remix VM (Cancun)**. 2. Make sure you have the `CCIPLocalSimulator.sol` file open in the main window. In the **Contract** dropdown, select `CCIPLocalSimulator`. Click **Deploy**. 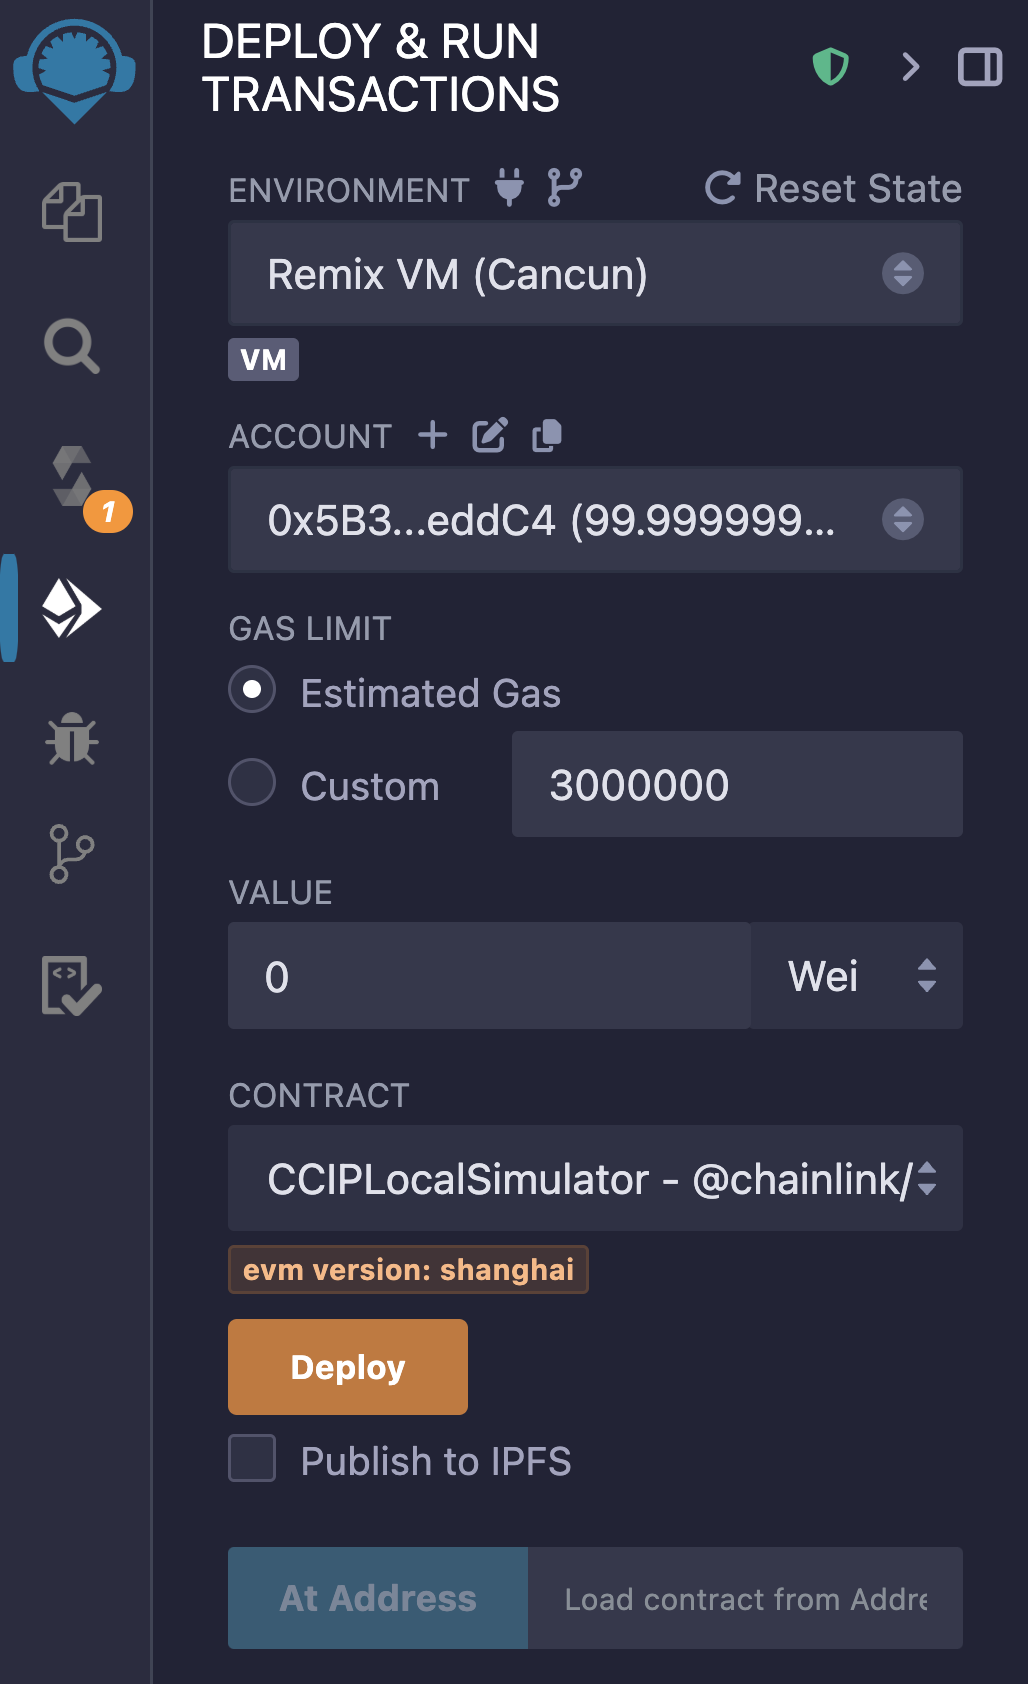 3. The `CCIPLocalSimulator` contract will now be visible in the **Deployed Contracts** section. 4. In the list of functions, click the `configuration` function to retrieve the configuration details for the pre-deployed contracts and services needed for local CCIP simulations. This data forms that on-chain infra we talked about earlier and you will be using the values returned by this function throughout this lesson (these are the values and addresses we would have looked up these values in the [Chainlink directory](https://docs.chain.link/ccip/directory/testnet) if we were working on a live blockchain). 5. Copy the **linkToken_** address. 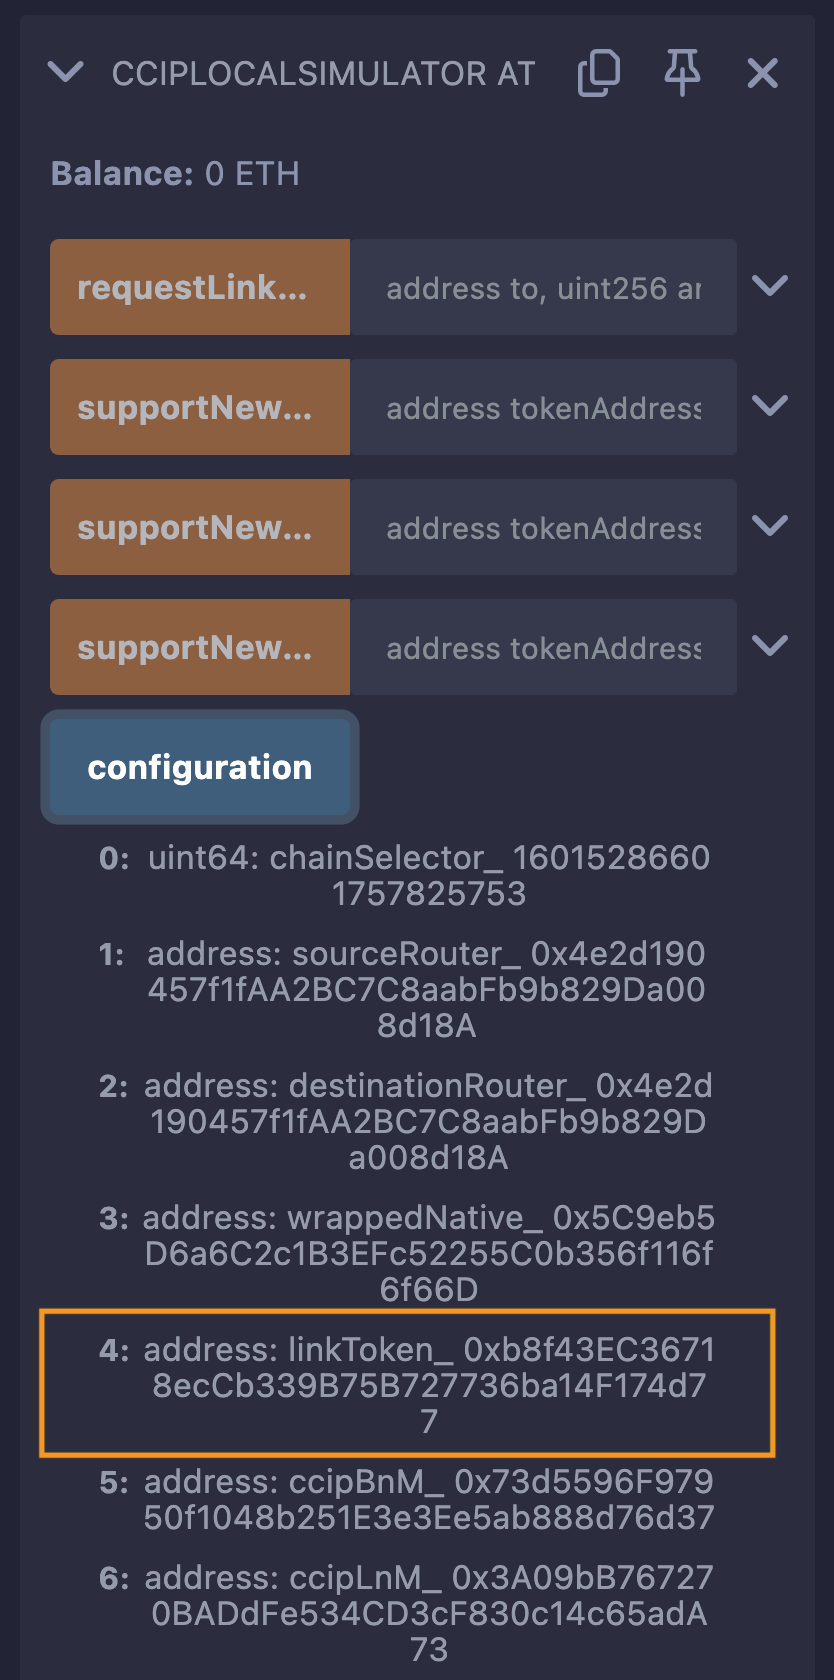 ### Deploy the LINK token We need to, as before, fund our `Sender` contract with LINK tokens to pay for CCIP. The LINK token contract is pre-deployed in the local simulator configuration, so you can simply load the LINK token contract instance: - Back up in the **Contracts** dropdown, select the `LinkToken` contract. - Paste the **linkToken_** address in the **At Address** box. - Click the **At Address** button. 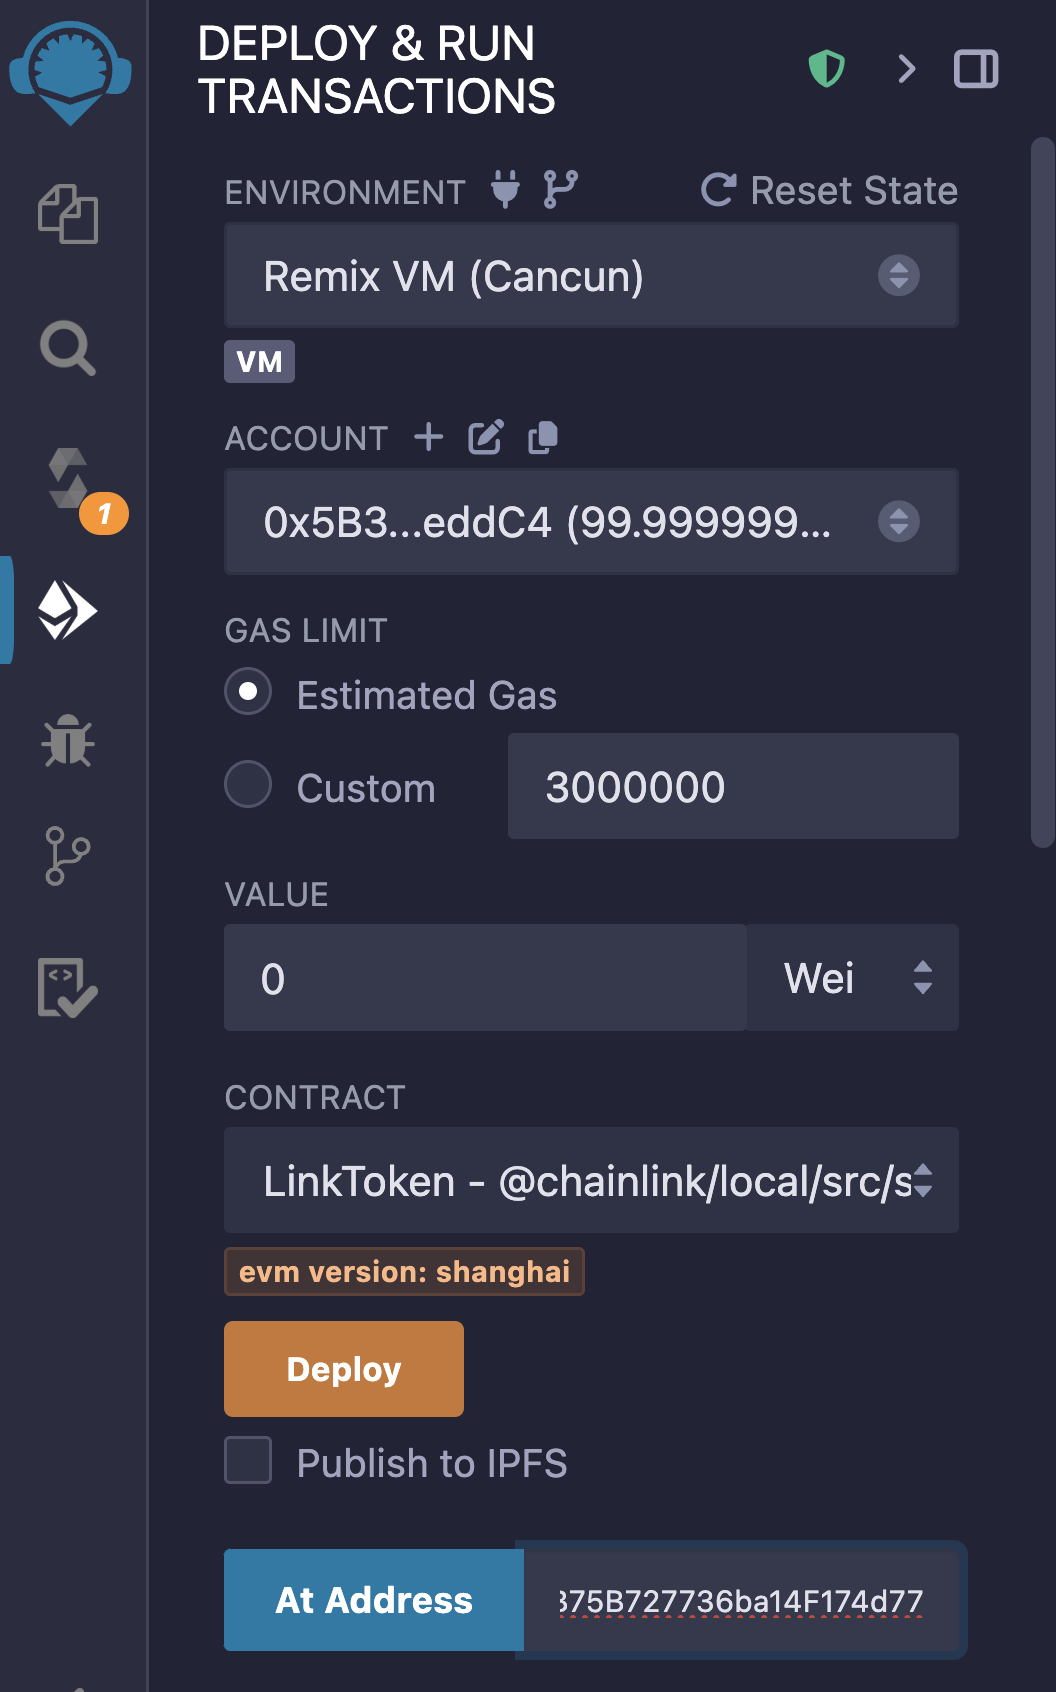 Now, the `LinkToken` contract will show in the **Deployed Contracts** section. We will be able to fund contracts with LINK. ### Deploy the MessageSender and MessageReceiver Now, we need to deploy the `MessageSender` and `MessageReceiver` contracts on the Remix VM (rather than on a live testnet): 1. Click on and compile the `MessageSender` contract. Use the following constructor parameters: - `_router`: copy and paste the `sourceRouter_` from the `configuration` call on the `CCIPLocalSimulator` contract. - `_LINK`: copy and paste the LINK token contract address you just deployed. - Click **transact** to deploy the contract. - Click on and compile the `MessageReceiver` contract. Use the following constructor parameter: - `router`: copy and paste the `destinationRouter_` from the `configuration` call on the `CCIPLocalSimulator` contract. - Click **transact** to deploy the contract. ## Send a cross-chain message using Chainlink Local Expand the `MessageSender` contract in the **Deployed Contracts** section and expand the `sendMessage` function. Use the following parameters: - `destinationChainSelector`: copy-paste the `chainSelector_` from the `configuration` call on the `CCIPLocalSimulator` contract. - `receiver`: copy the address of the `MessageReceiver` contract you just deployed. - `text`: some string message e.g. `"Hey there!"` **Note**: Remix will fail to estimate the gas properly for the `sendMessage` function.  To work around this, we need to set the gas limit manually to `3000000` by clicking the radio button at the top of the **Deploy and run transactions** tab: 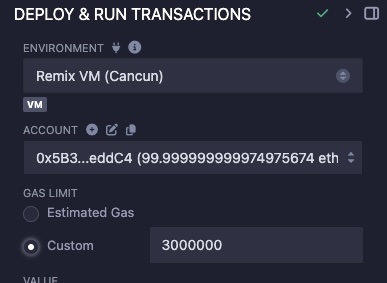 Click **transact** to call the function and test sending the CCIP message. 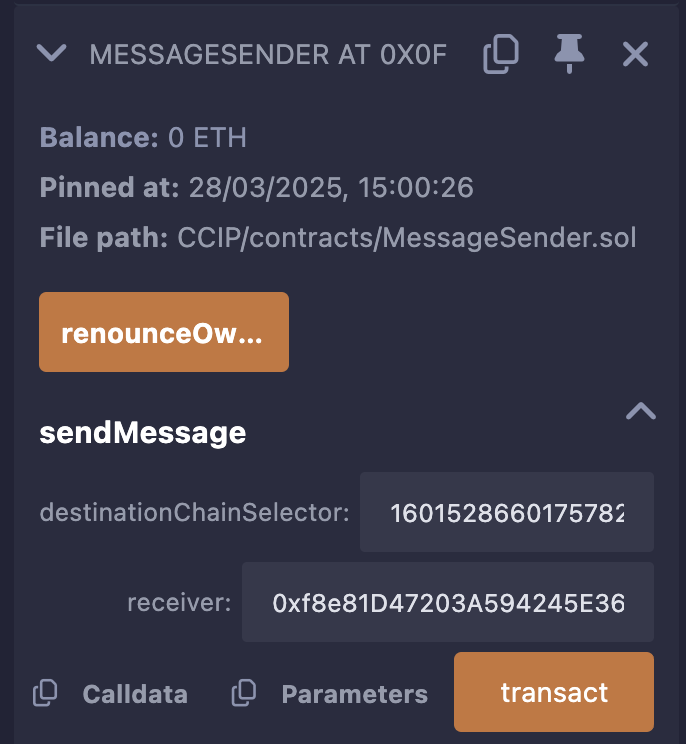 You'll notice this is near instant! No need to wait for finality - cool right! To check if the message was received by `MessageReceiver`, call the `getLastReceivedMessageDetails` function. You'll see the message ID and the message we sent using Chainlink Local! 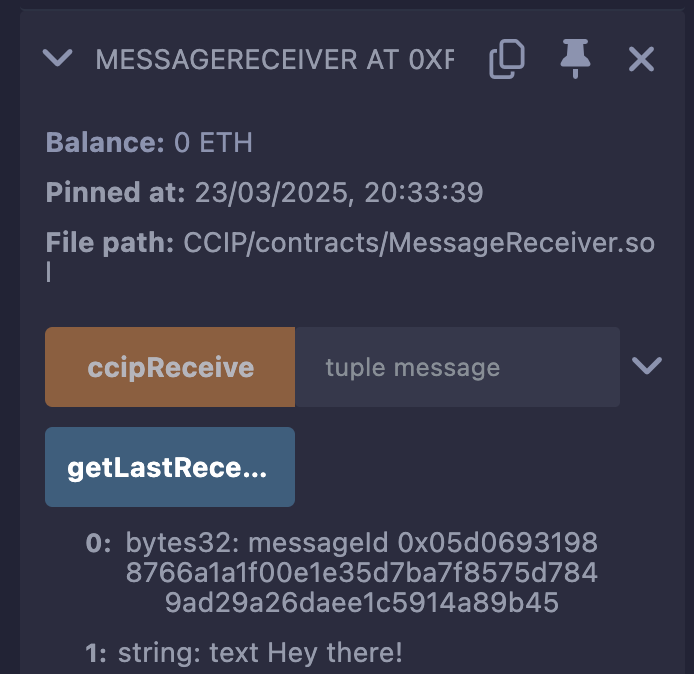 And that's it! You have successfully used Chainlink Local in Remix to test sending a cross-chain message with CCIP.
Using Chainlink Local
In this lesson, instead of using CCIP on a live testnet, we will use Chainlink Local to test sending a cross-chain message with CCIP.
We will test CCIP using Chainlink Local in Remix. We will send a simple string message cross-chain, e.g., "Hey There!"
Let's get started!
The MessageSender and MessageReceiver contracts
In this lesson, we will write and test, using Chainlink local, two contracts:
MessageSender: This contract would be deployed to the source chain. It will contain the logic to send the CCIP message, similar to the contract we wrote in Section 5.MessageReceiver: This contract will receive the cross-chain message. It will inherit theCCIPReceiverabstract contract needed to receive CCIP messages. This means it must implement the required_ccipReceivefunction to process the cross-chain message.
Note: The imports in these contracts require you to use a compiler version of 0.8.20 or higher.
The MessageSender contract
In Remix, inside the "CCIP" workspace you created in Section 5, create a new folder called chainlink-local and inside the folder, create a new file called MessageSender.sol. Copy and paste the code from the course code repo into the MessageSender.sol file.
As always, feel free to skip the code explainer and jump straight to deploying if you aren't interested in learning how to implement CCIP.
Code explainer
The logic of this contract is very similar to that of Section 5, so we will keep things high level. The main things to note are:
The LINK token and Router are set dynamically in the constructor rather than hard-coded. This is because we need to pass these through from Chainlink Local, which we will do shortly.
sendMessagesends the CCIP message. This contains the same logic as before, except no tokens are added to the tokens array, and a string,"Hey there!"is abi encoded and passed to thedatapart of theAny2EVMMessagestruct:
You'll also notice that we now have a non-zero gasLimit. This is because this gasLimit is used to execute _ccipReceive, which will be implemented on the MessageReceiver contract.
The Message Receiver contract
In Remix still, still inside the "CCIP" workspace you created in Section 5, create a new file called MessageReceiver.sol inside the chainlink-local folder from before, copy and paste the code from the course code repo into the MessageReceiver.sol file.
Code explainer
Imports
Client: Library providing the struct for CCIP messages.CCIPReceiver: Abstract contract that handles CCIP message receiving logic. The contract inherits this contract.
State variables
s_lastReceivedMessageId: stores the ID of the last received message.s_lastReceivedText: stores the content (text) of the last received message.
Constructor
Takes a router address as a parameter.
Passes this address to the parent
CCIPReceivercontract constructor.Remember from the previous section that the Router is the Chainlink CCIP contract that routes messages between chains.
Message receiving logic
This function is defined on
CCIPReceiverbut not implemented.Called automatically when a CCIP message is received.
Updates state variables with the message details.
Decodes the message data into a string using
abi.decode.Emits a
MessageReceivedevent with the message details.
Message getter function
Public function to retrieve the last received message details.
Returns both the message ID and its text content.
Create the CCIP Local Simulator contract
To use Chainlink Local in Remix, we need to use the CCIPLocalSimulator helper contract.
Create a file called CCIPLocalSimulator.sol in the contracts folder and paste the following code:
Here, we have just imported the CCIPLocalSimulator contract so we can deploy it locally and use it in our testing.
Deploy the contracts
Let's now test sending a cross-chain message from the MessageSender contract to the MessageReceiver contract using Chainlink Local.
Deploy the CCIPLocalSimulator
Let's deploy the CCIPLocalSimulator contract. Behind the scenes, this contract will deploy some mock contracts for us so that we can simulate the cross-chain message transfer. These contracts from the on-chain CCIP intra.
So far, in this course, we have exclusively deployed to a live testnet by connecting MetaMask using the Injected provider—MetaMask Environment option.
This time, we want to deploy to Remix's local node - Rexmix VM (Cancun).
-
In the Deploy & run transactions tab click the Environments dropdown and select Remix VM (Cancun).
-
Make sure you have the
CCIPLocalSimulator.solfile open in the main window. In the Contract dropdown, selectCCIPLocalSimulator. Click Deploy.

-
The
CCIPLocalSimulatorcontract will now be visible in the Deployed Contracts section. -
In the list of functions, click the
configurationfunction to retrieve the configuration details for the pre-deployed contracts and services needed for local CCIP simulations. This data forms that on-chain infra we talked about earlier and you will be using the values returned by this function throughout this lesson (these are the values and addresses we would have looked up these values in the Chainlink directory if we were working on a live blockchain). -
Copy the linkToken_ address.

Deploy the LINK token
We need to, as before, fund our Sender contract with LINK tokens to pay for CCIP. The LINK token contract is pre-deployed in the local simulator configuration, so you can simply load the LINK token contract instance:
- Back up in the Contracts dropdown, select the LinkToken contract.
- Paste the linkToken_ address in the At Address box.
- Click the At Address button.

Now, the LinkToken contract will show in the Deployed Contracts section. We will be able to fund contracts with LINK.
Deploy the MessageSender and MessageReceiver
Now, we need to deploy the MessageSender and MessageReceiver contracts on the Remix VM (rather than on a live testnet):
Click on and compile the
MessageSendercontract. Use the following constructor parameters:_router: copy and paste thesourceRouter_from theconfigurationcall on theCCIPLocalSimulatorcontract._LINK: copy and paste the LINK token contract address you just deployed.Click transact to deploy the contract.
Click on and compile the
MessageReceivercontract. Use the following constructor parameter:router: copy and paste thedestinationRouter_from theconfigurationcall on theCCIPLocalSimulatorcontract.Click transact to deploy the contract.
Send a cross-chain message using Chainlink Local
Expand the MessageSender contract in the Deployed Contracts section and expand the sendMessage function. Use the following parameters:
destinationChainSelector: copy-paste thechainSelector_from theconfigurationcall on theCCIPLocalSimulatorcontract.receiver: copy the address of theMessageReceivercontract you just deployed.text: some string message e.g."Hey there!"
Note: Remix will fail to estimate the gas properly for the sendMessage function.

To work around this, we need to set the gas limit manually to 3000000 by clicking the radio button at the top of the Deploy and run transactions tab:

Click transact to call the function and test sending the CCIP message.

You'll notice this is near instant! No need to wait for finality - cool right!
To check if the message was received by MessageReceiver, call the getLastReceivedMessageDetails function. You'll see the message ID and the message we sent using Chainlink Local!

And that's it! You have successfully used Chainlink Local in Remix to test sending a cross-chain message with CCIP.
Using Chainlink Local
A practical simulation to Using Chainlink Local - Explore testing Chainlink CCIP entirely within Remix using the `CCIPLocalSimulator`, deploying sender/receiver contracts and verifying cross-chain messages locally.

Course Overview
About the course
What you'll learn
Smart contract and Solidity fundamentals
Chainlink’s decentralized oracle network (DON)
Chainlink Data Feeds
Chainlink Data Streams
Chainlink Automation
Chainlink CCIP
Chainlink Functions
Verifiable Random Function (VRF)
Chainlink Proof of Reserve
Course Description
Who is this course for?
- Smart Contract Developers
- Solutions Architects
- Blockchain Engineers
- Web3 Developers
- Security Researchers
Potential Careers
Smart Contract Engineer
$100,000 - $150,000 (avg. salary)
DeFi Developer
$75,000 - $200,000 (avg. salary)
Web3 developer
$60,000 - $150,000 (avg. salary)
Web3 Developer Relations
$85,000 - $125,000 (avg. salary)
Smart Contract Auditor
$100,000 - $200,000 (avg. salary)
Security researcher
$49,999 - $120,000 (avg. salary)
Blockchain Financial Analyst
$100,000 - $150,000 (avg. salary)


Last updated on July 25, 2025

Certification: Chainlink Fundamentals
The Chainlink Fundamentals proficiency exam covers is designed to confirm your grasp of all key concepts and learnings presented in the course material. Exam takers will have 75 minutes to complete 50 questions and must score 30/50 to pass and earn a Certificate of Completion. Because course material is continually updated, The Chainlink Fundamentals Certificate of Completions expires after 1 year. To remain current, holders must re-take the exam and pass to confirm their current knowledge.

Course Overview
About the course
What you'll learn
Smart contract and Solidity fundamentals
Chainlink’s decentralized oracle network (DON)
Chainlink Data Feeds
Chainlink Data Streams
Chainlink Automation
Chainlink CCIP
Chainlink Functions
Verifiable Random Function (VRF)
Chainlink Proof of Reserve
Course Description
Who is this course for?
- Smart Contract Developers
- Solutions Architects
- Blockchain Engineers
- Web3 Developers
- Security Researchers
Potential Careers
Smart Contract Engineer
$100,000 - $150,000 (avg. salary)
DeFi Developer
$75,000 - $200,000 (avg. salary)
Web3 developer
$60,000 - $150,000 (avg. salary)
Web3 Developer Relations
$85,000 - $125,000 (avg. salary)
Smart Contract Auditor
$100,000 - $200,000 (avg. salary)
Security researcher
$49,999 - $120,000 (avg. salary)
Blockchain Financial Analyst
$100,000 - $150,000 (avg. salary)
Last updated on July 25, 2025