# Writing an ERC20 Token Contract In this tutorial, you will write your first smart contract! You will learn how to create an [ERC-20](https://eips.ethereum.org/EIPS/eip-20) token contract using OpenZeppelin and then learn how to add permissions to allow only certain addresses to mint tokens. ## What is an ERC-20? ERC-20 is a technical standard for fungible tokens on the Ethereum blockchain. "ERC" stands for "Ethereum Request for Comment," the naming convention for Ethereum improvement proposals. The "20" refers to the proposal number that created this standard. An ERC-20 token is a cryptocurrency that follows specific rules defined in this standard, including functions for transferring tokens, checking balances, and approving spending by third parties. These standardized functions ensure that ERC-20 tokens work consistently across the Ethereum ecosystem, allowing them to be easily exchanged, stored in wallets, and traded on decentralized exchanges. Popular examples include USDT (Tether), USDC, DAI, and many other cryptocurrencies that operate on Ethereum. ## Writing a Simple ERC20 Token Let's write our own ERC-20 token contract using Remix (Steps 1-3 were covered in lesson 4). 1. Create a new **Workspace** in Remix: - At the top of the **File Explorer** panel, click on the **Workspaces** actions button (the burger icon) - Select **Create blank** to create a new workspace. - Give a name for your workspace. In this example, we will use the name "CLF". - Hit **Ok** 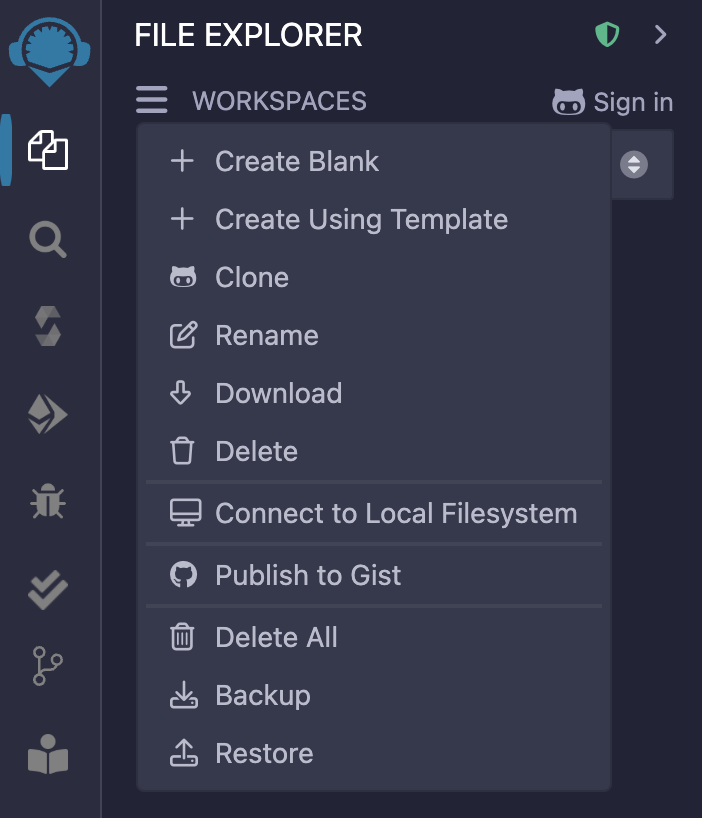 2. Create a new folder: - Right-click in the file explorer sidebar and click **New Folder** - Name the folder `contracts` 3. Create a new file: - Right-click on the `contracts` folder and click **New file** - Name the file `MyERC20.sol` 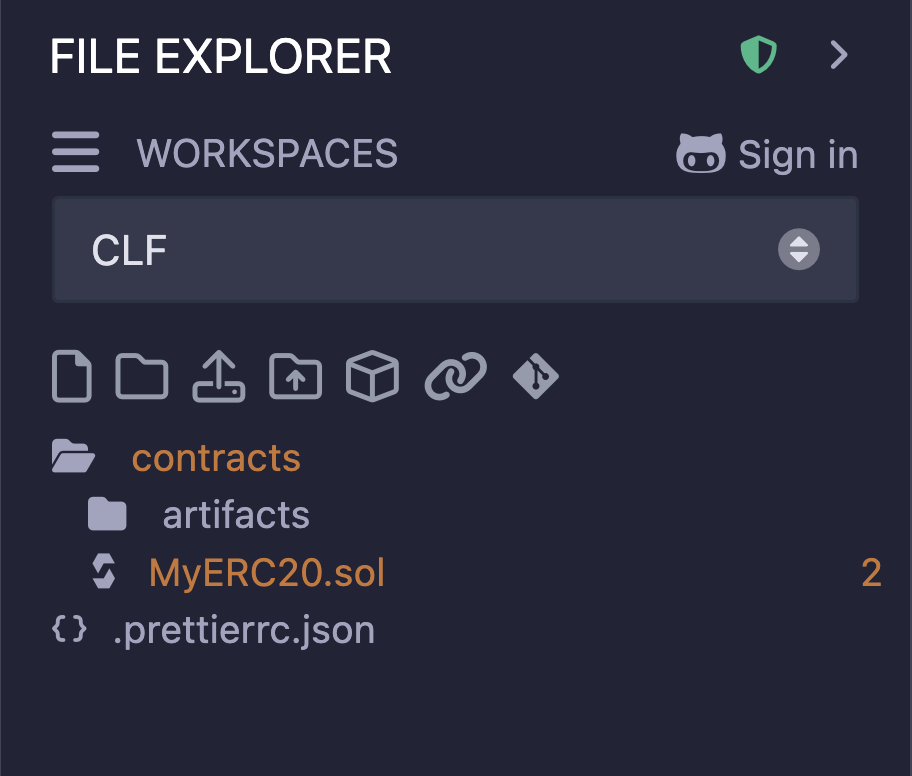 4. Write the code! - Copy and Paste the following token contract code: You could also create your token using the Openzeppelin Wizard. However, for now, you can use this pre-written one. For future smart contracts, you can copy and paste from the [course code repo](https://github.com/ciaranightingale/chainlink-fundamentals-code/blob/main/data-feeds/MyERC20.sol). ```solidity // SPDX-License-Identifier: MIT pragma solidity ^0.8.26; import { ERC20 } from "@openzeppelin/contracts@5.2.0/token/ERC20/ERC20.sol"; contract MyERC20 is ERC20 { constructor() ERC20("My Cyfrin CLF Token", "CLF") {} function mint(address to, uint256 amount) public { _mint(to, amount); } } ``` - Here, we have inherited the `ERC20` smart contract from OpenZeppelin by importing it and then inheriting it using the `is` keyword. - Then, in the `MyERC20` constructor, we have invoked the parent `ERC20` constructor: ```solidity constructor() ERC20("My Cyfrin CLF Token", "CLF") {} ``` - Finally, we created a way to create a supply of tokens by adding a public `mint` function: ```solidity function mint(address to, uint256 amount) public { _mint(to, amount); } ``` ## Adding Access Control As we learned in lesson 1, we can add access control to smart contracts using **modifiers**. We also learned in lessons 2 & 3 how to use dependencies, including OpenZeppelin. We have written a simple token smart contract called `MyERC20`. This contract can create new tokens via the `mint` function. However, currently, anyone can call this function and mint tokens (for free!). Let's change this. Let's add the ability to give roles to certain addresses to give them permission to mint tokens. ### Adding Access Control Using OpenZeppelin To add access control to our ERC-20 token contract, we will use OpenZeppelin's `AccessControl` smart contract. We need to import this contract and then inherit from it. Then, we can use the state variables, functions, and modifiers declared inside the `AccessControl` smart contract from within our ERC-20 contract. OpenZeppelin's `AccessControl` smart contract provides the ability to create [`Roles`](https://docs.openzeppelin.com/contracts/2.x/api/access#Roles). This is how they work: - Each new role created needs a _role identifier_ used to grant, revoke, and check if an account has a role. - We will create a single role that enables the addresses with this role to mint tokens. - This _role identifier_ is a `bytes32` `constant` variable. By convention, this is usually a hashed string of the role name (with the string in capitals since this is a constant): ```solidity bytes32 public constant MINTER_ROLE = keccak256("MINTER_ROLE"); ``` - This _role identitifier_ can now be passed to the functions in `AccessControl` to grant roles with the `AccessControl::grantRole` function, check whether an address has a role with the `AccessControl::hasRole` function, and revoke a role using the `AccessControl::revokeRole` function by passing in the _role identifier_ e.g. `MINTER_ROLE` and the required address to grant/check/revoke the role for. ### Adding a Minter Role to a Token Contract 1. Inherit the `AccessControl` contract: ```solidity // SPDX-License-Identifier: MIT pragma solidity ^0.8.19; import { ERC20 } from "@openzeppelin/contracts@4.6.0/token/ERC20/ERC20.sol"; import { AccessControl } from "@openzeppelin/contracts@4.6.0/access/AccessControl.sol"; contract MyERC20 is ERC20, AccessControl { constructor() ERC20("My Cyfrin CLF Token", "CLF") {} function mint(address to, uint256 amount) public { _mint(to, amount); } } ``` 2. Create a `bytes32` constant state variable containing the hashed name of the role–the _role identifier_: ```solidity // SPDX-License-Identifier: MIT pragma solidity ^0.8.19; import { ERC20 } from "@openzeppelin/contracts@4.6.0/token/ERC20/ERC20.sol"; import { AccessControl } from "@openzeppelin/contracts@4.6.0/access/AccessControl.sol"; contract MyERC20 is ERC20, AccessControl { bytes32 public constant MINTER_ROLE = keccak256("MINTER_ROLE"); constructor() ERC20("My Cyfrin CLF Token", "CLF") {} function mint(address to, uint256 amount) public { _mint(to, amount); } } ``` 3. Now, we can add the `onlyRole` modifier from the `AccessControl` contract to our `mint` function (since our token contract is inheriting this contract) to add a check that the `msg.sender` has the role that we pass to the modifier. ```solidity // SPDX-License-Identifier: MIT pragma solidity ^0.8.19; import { ERC20 } from "@openzeppelin/contracts@4.6.0/token/ERC20/ERC20.sol"; import { AccessControl } from "@openzeppelin/contracts@4.6.0/access/AccessControl.sol"; contract MyERC20 is ERC20, AccessControl { bytes32 public constant MINTER_ROLE = keccak256("MINTER_ROLE"); constructor() ERC20("My Cyfrin CLF Token", "CLF") {} function mint(address to, uint256 amount) public onlyRole(MINTER_ROLE) { _mint(to, amount); } } ``` And that's it! Now, only addresses with the `MINTER_ROLE` can call the `mint` function. However, we do not have a way to give addresses this `MINTER_ROLE`. To do this, we need another role that can grant roles to other addresses. OpenZeppelin's `AccessControl` contract has a role that does this already, called the `DEFAULT_ADMIN` role. Let's grant this role to the deployer in the constructor. When an address deploys a smart contract, it automatically calls the `constructor`. Therefore, the deployer is the `msg.sender` in the context of the `constructor`. Let's grant them the `DEFAULT_ADMIN` role and while we are at it, also the `MINTER_ROLE` so they can mint tokens. We can do this by calling the `_grantRole` function, which takes the role and the address to grant the role to: ```solidity // SPDX-License-Identifier: MIT pragma solidity ^0.8.19; import { ERC20 } from "@openzeppelin/contracts@4.6.0/token/ERC20/ERC20.sol"; import { AccessControl } from "@openzeppelin/contracts@4.6.0/access/AccessControl.sol"; contract MyERC20 is ERC20, AccessControl { bytes32 public constant MINTER_ROLE = keccak256("MINTER_ROLE"); constructor() ERC20("My Cyfrin CLF Token", "CLF") { _grantRole(DEFAULT_ADMIN_ROLE, msg.sender); _grantRole(MINTER_ROLE, msg.sender); } function mint(address to, uint256 amount) public onlyRole(MINTER_ROLE) { _mint(to, amount); } } ``` In a future lesson, we will learn how to grant another address a role using the `grantRole` function to allow them to mint `MyERC20` tokens. In the next lesson, we will learn how to compile, deploy, and interact with our `MyERC20` token and then add it to MetaMask. We can then view our balance and transfer tokens using the MetaMask UI.
Writing an ERC20 Token Contract
In this tutorial, you will write your first smart contract! You will learn how to create an ERC-20 token contract using OpenZeppelin and then learn how to add permissions to allow only certain addresses to mint tokens.
What is an ERC-20?
ERC-20 is a technical standard for fungible tokens on the Ethereum blockchain. "ERC" stands for "Ethereum Request for Comment," the naming convention for Ethereum improvement proposals. The "20" refers to the proposal number that created this standard. An ERC-20 token is a cryptocurrency that follows specific rules defined in this standard, including functions for transferring tokens, checking balances, and approving spending by third parties. These standardized functions ensure that ERC-20 tokens work consistently across the Ethereum ecosystem, allowing them to be easily exchanged, stored in wallets, and traded on decentralized exchanges. Popular examples include USDT (Tether), USDC, DAI, and many other cryptocurrencies that operate on Ethereum.
Writing a Simple ERC20 Token
Let's write our own ERC-20 token contract using Remix (Steps 1-3 were covered in lesson 4).
-
Create a new Workspace in Remix:
At the top of the File Explorer panel, click on the Workspaces actions button (the burger icon)
Select Create blank to create a new workspace.
Give a name for your workspace. In this example, we will use the name "CLF".
Hit Ok

-
Create a new folder:
Right-click in the file explorer sidebar and click New Folder
Name the folder
contracts
-
Create a new file:
Right-click on the
contractsfolder and click New fileName the file
MyERC20.sol

-
Write the code!
Copy and Paste the following token contract code: You could also create your token using the Openzeppelin Wizard. However, for now, you can use this pre-written one. For future smart contracts, you can copy and paste from the course code repo.
// SPDX-License-Identifier: MITimport { ERC20 } from "@openzeppelin/contracts@5.2.0/token/ERC20/ERC20.sol";contract MyERC20 is ERC20 {constructor() ERC20("My Cyfrin CLF Token", "CLF") {}function mint(address to, uint256 amount) public {_mint(to, amount);}}Here, we have inherited the
ERC20smart contract from OpenZeppelin by importing it and then inheriting it using theiskeyword.Then, in the
MyERC20constructor, we have invoked the parentERC20constructor:
constructor() ERC20("My Cyfrin CLF Token", "CLF") {}Finally, we created a way to create a supply of tokens by adding a public
mintfunction:
function mint(address to, uint256 amount) public {_mint(to, amount);}
Adding Access Control
As we learned in lesson 1, we can add access control to smart contracts using modifiers. We also learned in lessons 2 & 3 how to use dependencies, including OpenZeppelin.
We have written a simple token smart contract called MyERC20. This contract can create new tokens via the mint function. However, currently, anyone can call this function and mint tokens (for free!). Let's change this.
Let's add the ability to give roles to certain addresses to give them permission to mint tokens.
Adding Access Control Using OpenZeppelin
To add access control to our ERC-20 token contract, we will use OpenZeppelin's AccessControl smart contract. We need to import this contract and then inherit from it.
Then, we can use the state variables, functions, and modifiers declared inside the AccessControl smart contract from within our ERC-20 contract.
OpenZeppelin's AccessControl smart contract provides the ability to create Roles.
This is how they work:
-
Each new role created needs a role identifier used to grant, revoke, and check if an account has a role.
-
We will create a single role that enables the addresses with this role to mint tokens.
-
This role identifier is a
bytes32constantvariable. By convention, this is usually a hashed string of the role name (with the string in capitals since this is a constant):bytes32 public constant MINTER_ROLE = keccak256("MINTER_ROLE"); -
This role identitifier can now be passed to the functions in
AccessControlto grant roles with theAccessControl::grantRolefunction, check whether an address has a role with theAccessControl::hasRolefunction, and revoke a role using theAccessControl::revokeRolefunction by passing in the role identifier e.g.MINTER_ROLEand the required address to grant/check/revoke the role for.
Adding a Minter Role to a Token Contract
Inherit the
AccessControlcontract:
Create a
bytes32constant state variable containing the hashed name of the role–the role identifier:
Now, we can add the
onlyRolemodifier from theAccessControlcontract to ourmintfunction (since our token contract is inheriting this contract) to add a check that themsg.senderhas the role that we pass to the modifier.
And that's it! Now, only addresses with the MINTER_ROLE can call the mint function.
However, we do not have a way to give addresses this MINTER_ROLE. To do this, we need another role that can grant roles to other addresses. OpenZeppelin's AccessControl contract has a role that does this already, called the DEFAULT_ADMIN role.
Let's grant this role to the deployer in the constructor. When an address deploys a smart contract, it automatically calls the constructor. Therefore, the deployer is the msg.sender in the context of the constructor.
Let's grant them the DEFAULT_ADMIN role and while we are at it, also the MINTER_ROLE so they can mint tokens. We can do this by calling the _grantRole function, which takes the role and the address to grant the role to:
In a future lesson, we will learn how to grant another address a role using the grantRole function to allow them to mint MyERC20 tokens.
In the next lesson, we will learn how to compile, deploy, and interact with our MyERC20 token and then add it to MetaMask. We can then view our balance and transfer tokens using the MetaMask UI.
Writing An ERC-20 Token
A hands-on tutorial to Writing an ERC-20 Token Contract - Follow step-by-step instructions to create your first ERC-20 token using OpenZeppelin contracts. Add role-based permissions using `AccessControl` to control who can mint new tokens.

Course Overview
About the course
What you'll learn
Smart contract and Solidity fundamentals
Chainlink’s decentralized oracle network (DON)
Chainlink Data Feeds
Chainlink Data Streams
Chainlink Automation
Chainlink CCIP
Chainlink Functions
Verifiable Random Function (VRF)
Chainlink Proof of Reserve
Course Description
Who is this course for?
- Smart Contract Developers
- Solutions Architects
- Blockchain Engineers
- Web3 Developers
- Security Researchers
Potential Careers
Smart Contract Engineer
$100,000 - $150,000 (avg. salary)
DeFi Developer
$75,000 - $200,000 (avg. salary)
Web3 developer
$60,000 - $150,000 (avg. salary)
Web3 Developer Relations
$85,000 - $125,000 (avg. salary)
Smart Contract Auditor
$100,000 - $200,000 (avg. salary)
Security researcher
$49,999 - $120,000 (avg. salary)
Blockchain Financial Analyst
$100,000 - $150,000 (avg. salary)


Last updated on July 25, 2025

Certification: Chainlink Fundamentals
The Chainlink Fundamentals proficiency exam covers is designed to confirm your grasp of all key concepts and learnings presented in the course material. Exam takers will have 75 minutes to complete 50 questions and must score 30/50 to pass and earn a Certificate of Completion. Because course material is continually updated, The Chainlink Fundamentals Certificate of Completions expires after 1 year. To remain current, holders must re-take the exam and pass to confirm their current knowledge.

Course Overview
About the course
What you'll learn
Smart contract and Solidity fundamentals
Chainlink’s decentralized oracle network (DON)
Chainlink Data Feeds
Chainlink Data Streams
Chainlink Automation
Chainlink CCIP
Chainlink Functions
Verifiable Random Function (VRF)
Chainlink Proof of Reserve
Course Description
Who is this course for?
- Smart Contract Developers
- Solutions Architects
- Blockchain Engineers
- Web3 Developers
- Security Researchers
Potential Careers
Smart Contract Engineer
$100,000 - $150,000 (avg. salary)
DeFi Developer
$75,000 - $200,000 (avg. salary)
Web3 developer
$60,000 - $150,000 (avg. salary)
Web3 Developer Relations
$85,000 - $125,000 (avg. salary)
Smart Contract Auditor
$100,000 - $200,000 (avg. salary)
Security researcher
$49,999 - $120,000 (avg. salary)
Blockchain Financial Analyst
$100,000 - $150,000 (avg. salary)
Last updated on July 25, 2025