5/5
_Follow along the course with this video._ --- ### Basic NFT Testnet Demo Seeing our NFT minting in our tests is cool and all, but to really appreciate them, we want to see them in our wallet. We want to see the art _in_ Metamask, _on_ OpenSea, we gotta make it real. So let's do that. Before we get started, I'll mention you don't _have_ to do this yourself. This process will cost testnet funds, so it's fine to just follow along if needed. An alternative way to view your NFT would be to import your Anvil chain into Metamask and continue to use your local blockchain. If that works for you, great! Otherwise, let's continue with deploying this on an actual testnet. We'll be leveraging a Makefile for this again, I'll just be copying mine from the GitHub repo associated with this course, I've also provided it below for your convenience. Makefile: ```make -include .env .PHONY: all test clean deploy fund help install snapshot format anvil DEFAULT_ANVIL_KEY := 0xac0974bec39a17e36ba4a6b4d238ff944bacb478cbed5efcae784d7bf4f2ff80 help: @echo "Usage:" @echo " make deploy [ARGS=...]\n example: make deploy ARGS=\"--network sepolia\"" @echo "" @echo " make fund [ARGS=...]\n example: make deploy ARGS=\"--network sepolia\"" all: clean remove install update build # Clean the repo clean :; forge clean # Remove modules remove :; rm -rf .gitmodules && rm -rf .git/modules/* && rm -rf lib && touch .gitmodules && git add . && git commit -m "modules" install :; forge install Cyfrin/foundry-devops@0.0.11 --no-commit && forge install foundry-rs/forge-std@v1.5.3 --no-commit && forge install openzeppelin/openzeppelin-contracts@v4.8.3 --no-commit # Update Dependencies update:; forge update build:; forge build test :; forge test snapshot :; forge snapshot format :; forge fmt anvil :; anvil -m 'test test test test test test test test test test test junk' --steps-tracing --block-time 1 NETWORK_ARGS := --rpc-url http://localhost:8545 --private-key $(DEFAULT_ANVIL_KEY) --broadcast ifeq ($(findstring --network sepolia,$(ARGS)),--network sepolia) NETWORK_ARGS := --rpc-url $(SEPOLIA_RPC_URL) --private-key $(PRIVATE_KEY) --broadcast --verify --etherscan-api-key $(ETHERSCAN_API_KEY) -vvvv endif deploy: @forge script script/DeployBasicNft.s.sol:DeployBasicNft $(NETWORK_ARGS) Mint: @forge script script/Interactions.s.sol:MintNFT ${NETWORK_ARGS} deployMood: @forge script script/DeployMoodNft.s.sol:DeployMoodNft $(NETWORK_ARGS) mintMoodNft: @forge script script/Interactions.s.sol:MintMoodNft $(NETWORK_ARGS) flipMoodNft: @forge script script/Interactions.s.sol:FlipMoodNft $(NETWORK_ARGS) ``` Assuming our `.env` is ready to go, we should be able to run the following... > ❗ **PROTIP** > Remember to add the required environment variables if necessary. You should need a `sepolia RPC-URL`, an `account private key` and an `etherscan api key`. ```bash make deploy ARGS="--network sepolia" ``` After a brief wait...  All deployed! With a contract deployed, this transaction data, including the contract address is added to our `broadcast` folder within run-latest.json. This is how our `DevOpsTool` acquires the most recent contract deployment. We should now be able to use our `Interactions.s.sol` script to mint ourselves an NFT. > ❗ **IMPORTANT** > Add `fs_permissions = [{ access = "read", path = "./broadcast" }]` to your `foundry.toml` or DevOpsTools won't have the permissions necessary to function correctly! This is more safe than `FFI=true`. ```bash make mint ARGS="--network sepolia" ``` While this is minting, we can navigate to our Metamask wallet and import our NFT Token. Grab the address of the contract we deployed from Etherscan (or `broadcast/DeployBasicNft.s.sol/11155111/run-latest.json`).  Enter the contract address and a tokenId of `0` when prompted. Then, after a brief wait...  We can see our NFT in our wallet!!! ### Wrap Up Amazing work! We've deployed an NFT protocol to a testnet, we've minted ourselves an NFT programmatically, and we've imported that Token right into our wallet. Our adorable Pup is our to do with as we please! We've learnt so much already and you should be very proud, but it's not time to stop yet. In the next lesson we'll discuss the pros and cons of data storage and the services and methodologies available to us. Let's gooo!  While testing is a vital part of NFT creation, deploying it in a real use case can bring more clarity to your understanding. Luckily, there are several ways to deploy your NFT. You could consider using Anvil, your own Anvil server, or a testnet. If you're not keen on waiting for the testnet or spending the gas, I'd recommend deploying it to Anvil. The processes detailed below are optional, but feel free to follow along if you'd like. ### Using a Makefile for Quick Deployment Rather than typing out long scripts, we'll use a makefile here. The associated Git repo contains the makefile we're using, allowing you to simply copy and paste rather than rewriting everything. In the makefile, we've captured most of the topics we've discussed so far, including our deploy script, which we'll use to deploy our basic NFT.  Here is what the deploy script looks like: ```makefile deploy: @forge script script/DeployBasicNft.s.sol:DeployBasicNft $(NETWORK_ARGS) ``` It's important here to ensure you have included your environmental variables. It's noteworthy that you should write some tests before deploying on a testnet, although for the sake of showing you what the NFT looks like, we'll skip this step in this instance. ## Deploying Our Basic NFT We're now going to deploy our basic NFT to the contract address. After successful deployment, there will be a short wait for its verification. ### Extracting Contract Info and Minting With our NFT deployed, we'll now move to extract our contract data. In the broadcast folder, the latest run contains the created basic NFT information. We'll execute the following command to initiate the Mint function: ```makefile mint: @forge script script/Interactions.s.sol:Interactions $(NETWORK_ARGS) ``` The DevOps tool works by grabbing the most recent contract from this folder, thus automating the process. ## Importing NFT into MetaMask While the NFT is being minted, let's transition to MetaMask: 1. Copy the contract address under which the NFT was deployed. 2. From MetaMask, go to NFTs and switch to Sepolia. 3. Click on Import NFTs and paste the copied address. 4. Since we're the first to create this NFT, the token ID will be zero. Input this and hit 'Add'. After a short wait, your NFT will be viewable right from your MetaMask wallet. It's intelligent enough to extract the token URI, allowing you to view the image, contract address, or send it elsewhere. Congratulations! You've successfully deployed and imported an NFT into MetaMask. You can now interact with it just as you would in a marketplace like OpenSea. Through this process, you've learned how to make an NFT come to life, from being just a script to being part of the real-world, bridging the gap between test environments and real applications. Stay tuned for our next post on advanced NFT creation steps, such as a complete DeFi app development and more.
Follow along the course with this video.
Basic NFT Testnet Demo
Seeing our NFT minting in our tests is cool and all, but to really appreciate them, we want to see them in our wallet. We want to see the art in Metamask, on OpenSea, we gotta make it real.
So let's do that.
Before we get started, I'll mention you don't have to do this yourself. This process will cost testnet funds, so it's fine to just follow along if needed. An alternative way to view your NFT would be to import your Anvil chain into Metamask and continue to use your local blockchain. If that works for you, great! Otherwise, let's continue with deploying this on an actual testnet.
We'll be leveraging a Makefile for this again, I'll just be copying mine from the GitHub repo associated with this course, I've also provided it below for your convenience.
Makefile:
Assuming our .env is ready to go, we should be able to run the following...
❗ PROTIP
Remember to add the required environment variables if necessary. You should need asepolia RPC-URL, anaccount private keyand anetherscan api key.
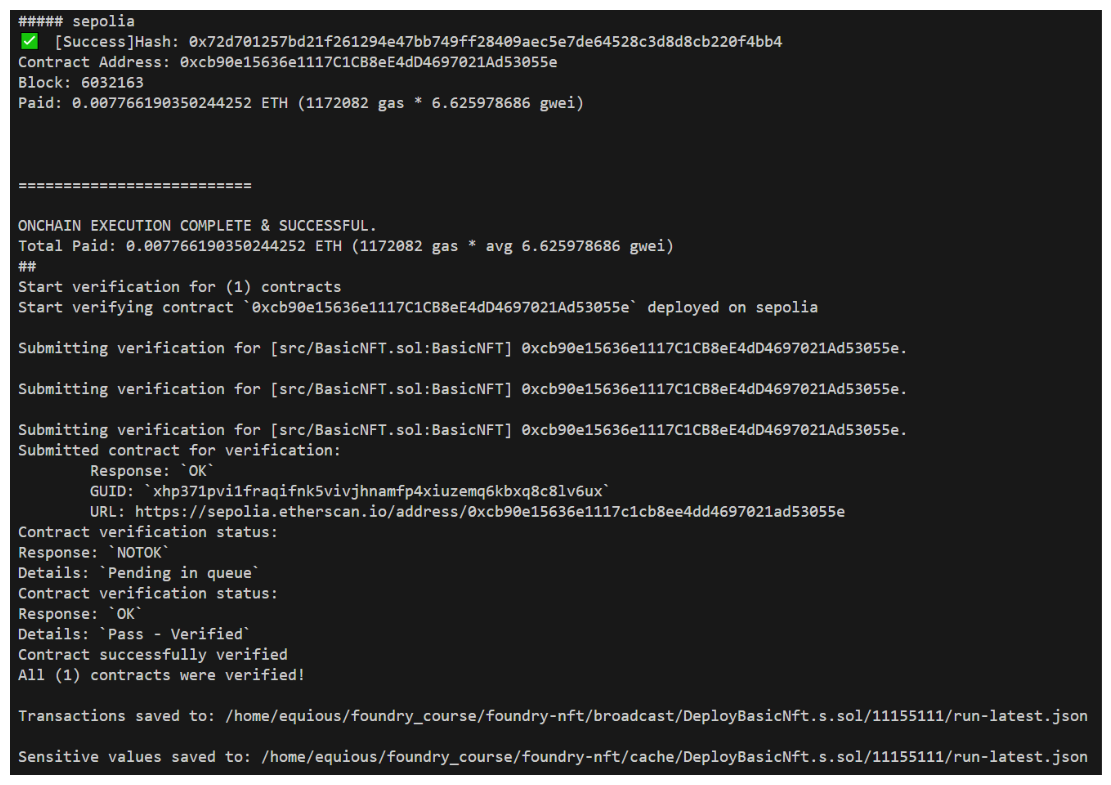
After a brief wait...

All deployed!
With a contract deployed, this transaction data, including the contract address is added to our broadcast folder within run-latest.json. This is how our DevOpsTool acquires the most recent contract deployment. We should now be able to use our Interactions.s.sol script to mint ourselves an NFT.
❗ IMPORTANT
Addfs_permissions = [{ access = "read", path = "./broadcast" }]to yourfoundry.tomlor DevOpsTools won't have the permissions necessary to function correctly! This is more safe thanFFI=true.
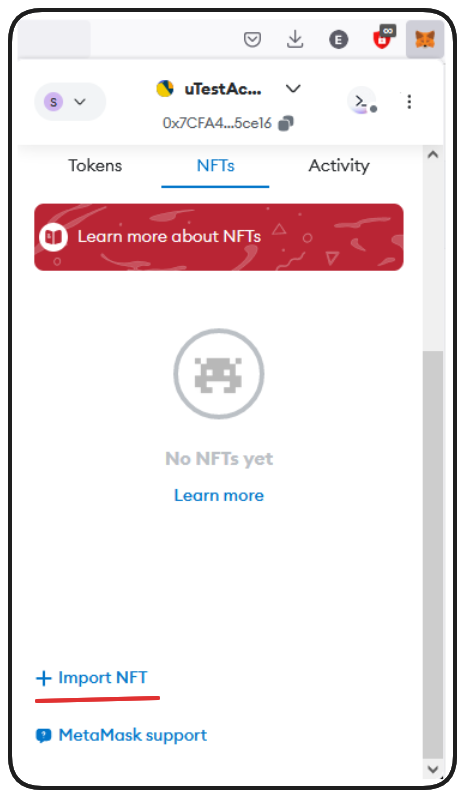
While this is minting, we can navigate to our Metamask wallet and import our NFT Token. Grab the address of the contract we deployed from Etherscan (or broadcast/DeployBasicNft.s.sol/11155111/run-latest.json).

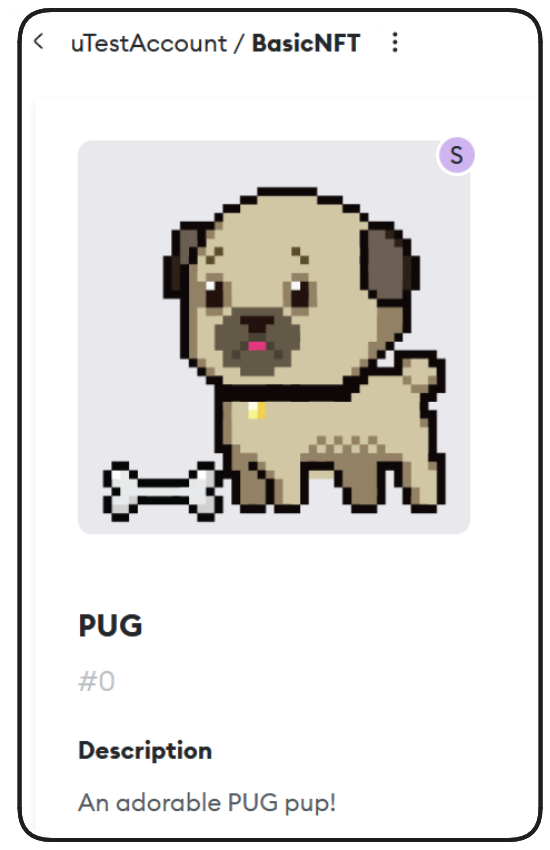
Enter the contract address and a tokenId of 0 when prompted. Then, after a brief wait...

We can see our NFT in our wallet!!!
Wrap Up
Amazing work! We've deployed an NFT protocol to a testnet, we've minted ourselves an NFT programmatically, and we've imported that Token right into our wallet. Our adorable Pup is our to do with as we please!
We've learnt so much already and you should be very proud, but it's not time to stop yet. In the next lesson we'll discuss the pros and cons of data storage and the services and methodologies available to us.
Let's gooo!

While testing is a vital part of NFT creation, deploying it in a real use case can bring more clarity to your understanding. Luckily, there are several ways to deploy your NFT. You could consider using Anvil, your own Anvil server, or a testnet. If you're not keen on waiting for the testnet or spending the gas, I'd recommend deploying it to Anvil.
The processes detailed below are optional, but feel free to follow along if you'd like.
Using a Makefile for Quick Deployment
Rather than typing out long scripts, we'll use a makefile here. The associated Git repo contains the makefile we're using, allowing you to simply copy and paste rather than rewriting everything.
In the makefile, we've captured most of the topics we've discussed so far, including our deploy script, which we'll use to deploy our basic NFT.

Here is what the deploy script looks like:
It's important here to ensure you have included your environmental variables.
It's noteworthy that you should write some tests before deploying on a testnet, although for the sake of showing you what the NFT looks like, we'll skip this step in this instance.
Deploying Our Basic NFT
We're now going to deploy our basic NFT to the contract address. After successful deployment, there will be a short wait for its verification.
Extracting Contract Info and Minting
With our NFT deployed, we'll now move to extract our contract data. In the broadcast folder, the latest run contains the created basic NFT information. We'll execute the following command to initiate the Mint function:
The DevOps tool works by grabbing the most recent contract from this folder, thus automating the process.
Importing NFT into MetaMask
While the NFT is being minted, let's transition to MetaMask:
Copy the contract address under which the NFT was deployed.
From MetaMask, go to NFTs and switch to Sepolia.
Click on Import NFTs and paste the copied address.
Since we're the first to create this NFT, the token ID will be zero. Input this and hit 'Add'.
After a short wait, your NFT will be viewable right from your MetaMask wallet. It's intelligent enough to extract the token URI, allowing you to view the image, contract address, or send it elsewhere.
Congratulations! You've successfully deployed and imported an NFT into MetaMask. You can now interact with it just as you would in a marketplace like OpenSea. Through this process, you've learned how to make an NFT come to life, from being just a script to being part of the real-world, bridging the gap between test environments and real applications.
Stay tuned for our next post on advanced NFT creation steps, such as a complete DeFi app development and more.
Deploy Your NFTs on a Testnet
A comparative analysis to Understanding NFT Metadata Storage: HTTPS, IPFS, and On-Chain SVGs - Analyze the pros and cons of storing NFT metadata and assets via HTTPS, IPFS, and directly on-chain using SVGs, focusing on decentralization, persistence, and cost. Understand the critical role of IPFS pinning services for ensuring long-term data availability.
Previous lesson
Previous
Next lesson
Next
Obtaining testnet funds -> Tenderly virtual testnets
Last updated on February 7, 2026
Course Overview
About the course
What you'll learn
Advanced smart contract development
How to develop a stablecoin
How to develop a DeFi protocol
How to develop a DAO
Advanced smart contracts testing
Fuzz testing
Manual verification
Course Description
Who is this course for?
- Engineers
- Smart Contract Security researchers
Potential Careers
Web3 Developer Relations
$85,000 - $125,000 (avg. salary)
Web3 developer
$60,000 - $150,000 (avg. salary)
Smart Contract Engineer
$100,000 - $150,000 (avg. salary)
Smart Contract Auditor
$100,000 - $200,000 (avg. salary)
Security researcher
$49,999 - $120,000 (avg. salary)
Meet your instructors
Web3 engineer, educator, and Cyfrin co-founder. Patrick's smart contract development and security courses have helped hundreds of thousands of engineers kickstarting their careers into web3.
Guest lecturers:
Last updated on January 21, 2026
Duration: 37min
Duration: 3h 06min
Duration: 5h 03min
Duration: 6h 02min
Duration: 2h 48min
Duration: 1h 23min
Duration: 4h 28min
Duration: 1h 20min
Duration: 1h 11min
Course Overview
About the course
What you'll learn
Advanced smart contract development
How to develop a stablecoin
How to develop a DeFi protocol
How to develop a DAO
Advanced smart contracts testing
Fuzz testing
Manual verification
Course Description
Who is this course for?
- Engineers
- Smart Contract Security researchers
Potential Careers
Web3 Developer Relations
$85,000 - $125,000 (avg. salary)
Web3 developer
$60,000 - $150,000 (avg. salary)
Smart Contract Engineer
$100,000 - $150,000 (avg. salary)
Smart Contract Auditor
$100,000 - $200,000 (avg. salary)
Security researcher
$49,999 - $120,000 (avg. salary)
Meet your instructors
Web3 engineer, educator, and Cyfrin co-founder. Patrick's smart contract development and security courses have helped hundreds of thousands of engineers kickstarting their careers into web3.
Guest lecturers:
Last updated on January 21, 2026


